1. Features, specs
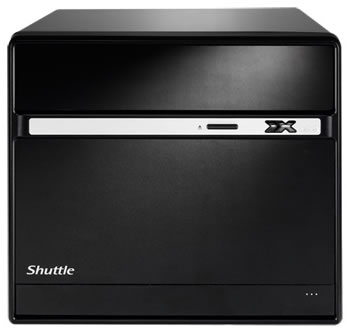
Today we will examine Shuttle's latest proposal for all those who need a compact and stylish small factor system, the SH55J2. Designed to support Intel's highly overclockable LGA1156 processors, DDR3 memory and powered by the H55 chipset, the XPC Barebone SH55J2 combines performance with style. But first lets meet the SH55J2 main specifications.
The XPC Barebone SH55J2 boasts a J2 design, support for the latest processors with integrated graphics core and fast DDR3 memory . The Intel Core i7/i5/i3 processors based on Socket 1156 with high computing power and relatively low power consumption are suitable for Mini-PCs. Despite its compact dimensions it still manages to find space for a PCI-Express slot, DDR3 memory, HDMI interface, Gigabit LAN, 8-channel audio with S/PDIF out (optional) and an array of interfaces. The barebone is also equipped with an 80 Plus certified 300W power supply and an effective heatpipe cooling system for efficient thermals and stability.
- Features
Intel H55 Express Chipset
The design of the Intel new Core i3/i5/i7 processors will eliminate the need for the traditional Northbridge found on previous generation of mainboards. Thus, the Shuttle SH55J2 sports Intel’s H55 Express Platform Controller Hub(PCH) from the Intel 5 series "Ibexpeak" family, which will integrate the hard drive controller, network controllers, monitor physical interfaces, PCI controller and other input/output functionally.
|
Supports Dual-Slot Graphics Cards
With the space-efficient design, the SH55J2 is as roomy as it gets, maximizing the headroom for enthusiasts and power users to upgrade to the latest graphics cards. Despite the small housing, the SH55J2 is capable of running dual-slot (double-width) PCI Express graphics cards.
|
Built-in Intel HD Graphics Engine
The Intel Core i3/i5/i7 processors integrate the Intel HD Graphics engine which supports full 1080p high-definition video playback, including Bluray disc movies. It features Intel Clear Video Technology and the optimized 3D graphics engine supports DirectX 10, and delivers the performance and compatibility you need for entertaining.
|
eSATA-USB Combo Port
Shuttle SH55J2 incorporates an eSATA-USB combo port into its front panel. The combo port combines the convenience of USB power while supplies the high speed of eSATA. There is no additional power source required when connecting the eSATA-USB combo device and thus helps to save space and maximize flexibility.
|
| Mini-ITX Motherboard Support
Shuttle expands the capabilities of its chassis, adding support for Mini-ITX motherboards(170 x 170mm or 6.7 x 6.7 inches). Now, the Shuttle chassis can go beyond the Shuttle motherboard. You can easily upgrade the motherboard to your desire. |
| Minimum of 80% Efficiency Guaranteed
The 80 PLUS performance specification requires power supplies in computers and servers to be 80% or greater energy efficient. This makes an 80 PLUS certified power supply up to 33% more efficient than current power supplies. 300W high efficiency & energy saving power supply of SH55J2 is guaranteed by 80 PLUS BRONZE certification. |
|
- Full specifications
- Chassis
J2-type chassis, color: black
Case cover made of aluminum, body made of steel
storage bays: 1 x 5.25" (external), 2 x 3.5" (internal)
Front door for I/O ports / card reader and optical drive
Kensington Security Slot at the back panel (also called a K-Slot
or Kensington lock) as a part of an anti-theft system
Dimensions: 33 x 21,5 x 19 cm (LWH), 13.5 litres
Weight: 7.0 kg net / 7.8 kg gross
Compatible with Mainboards in Shuttle or Mini-ITX Form Factor
- Mainboard / Chipset
Shuttle FH55, Shuttle form factor, proprietary design for XPC SH55J2
Chipset: Intel® H55 Express (Codename: Ibex Peak, 65nm process)
Platform Controller Hub (PCH) as Single-Chip-Solution
- BIOS
AMI BIOS, SPI Interface, 16MBit Flash-ROM
Supports PnP, ACPI 3.0
Supports boot up from external USB flash memory
- Power supply
300 Watt mini PSU, AC input voltage: 100~240V
80 PLUS® certified (80% or greater energy-efficient)
Active PFC circuit (Power Factor Correction)
ATX main power connectors: 2x10 and 2x2 pins
- Processor support
Socket 1156 supports Intel Core i3 / i5 / i7-8xx desktop processors
Supports Intel QuickPath Interconnect (QPI) at 4.8 and 6.4 GT/s
Supports maximum TDP = 95W (power consumption)
The Processor integrates PCI-Express and memory controller
and the graphics engine as an option.
Please refer to the support list for detailed processor support information.
- Processor cooling
Shuttle I.C.E. (Integrated Cooling Engine)
advanced I.C.E. Heatpipe technology, linear controlled 92mm fan
SilentX cooling and noise reduction technology with Active Airflow
- Memory support
4 x 240 pin slots
Supports DDR3-1066/1333 SDRAM memory (PC3-8500/10600)
Supports DDR3-1600 (PC3-12800) in overclocking mode
Supports 2+2 Dual Channel mode
Supports max. 4 GB per DIMM, maximum total size of 16 GB
- Integrated Graphics
The Intel Core i3/i5 32nm Clarkdale processor integrates the
Intel® HD Graphics engine with Flexible Display Interface (FDI)
Resolution max. 1920 x 1200 (supports 720p, 1080i und 1080p)
Shared Memory: up to 768MB
Decodes MPEG-2, H.264 and VC-1 in hardware (supports Blu-ray)
Supports DirectX 10, OpenGL 2.1, Shader Model 4.0
Supports Dual-Independent-Display via HDMI and VGA port )
- Slots
1x PCI-Express v2.0 slot (PEG, for graphics cards only)
1x PCI 32 bit slot
Supports Dual-slot (double-width) graphics cards -
in this case the PCI slot will be occupied.
If a discrete graphics card is used, the onboard graphics will be deactivated.
- HD audio
7.1 channel High Definition Audio with Realtek ALC888 codec
Azalia standard support
Analog: line-out (8-ch), line-in, microphone, AUX input (onboard)
Digital: optical S/PDIF-out, also via HDMI output
- Gigabit LAN
Realtek RTL 8111E Ethernet network controller
PCI Express interface
IEEE 802.3u 1000Base-T compliant
Supports 10 / 100 / 1.000 MBit/s operation
Supports Wake-on-LAN (WOL)
- Card reader
Integrated USB 2.0 multi format card reader in the front panel supports:
Secure Digital (SD, SDHC), MultiMediaCard (MMC),
Memory Stick (MS Pro/Pro Duo/Pro-HG)
- Drive connectors
4x Serial ATA (3 Gbit/s)
1x External Serial ATA (3 Gbit/s) at the front panel
- Front Panel connectors and buttons
Microphone input
Headphone output
USB 2.0
eSATA / USB 2.0 combo port
4-in-1 Card Reader (SD, SDHC, MMC, MS/Pro/Duo)
Power button
Power indicator (white LED)
Hard disk/Optical disk drive indicator (blue LED)
- Back Panel connectors
HDMI (digital video out with digital audio) **)
D-Sub VGA (analog video out) **)
4x USB 2.0
GigaBit LAN (RJ45)
8-ch Audio line-out (2x rear/front, bass/center, surround/back)
Audio Line-in
Digital Audio: optical S/PDIF output
Clear CMOS button
- Other connectors
4x USB 2.0 (two sets with 2x5 pins)
2x fan connectors ( 4 pins and 3 pins)
Audio AUX input
- Accessories
Multilanguage XPC Installation Guide
32/64bit driver disk for Windows XP/Vista/7
Preinstalled cables: 2x SATA,
Power Cord
Screws
Heatsink Compound
2. Opening the package
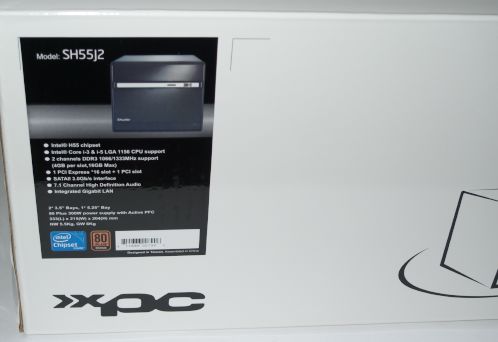
The Shuttle SH55J2 barebone costs €268 according to the Shuttle's official price listing. At this price you will get the external box, the mini-atx motherboard and the 300 Watt power supply.
The device retails in a simple, white box with just a specification sticker placed on the left side of it:.
The contents are well organized and secured into protective packaging:
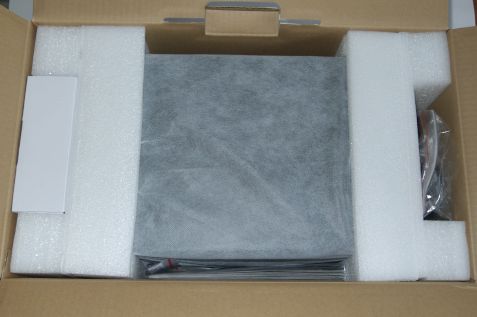
Here is what you will find in the box :
- The SH55J2 XTC Barebone
- Shuttle Manual & Quick Reference
- Driver CD
- IDE to SATA power cable;
- Mounting screws
- Thermal paste
- Power cord
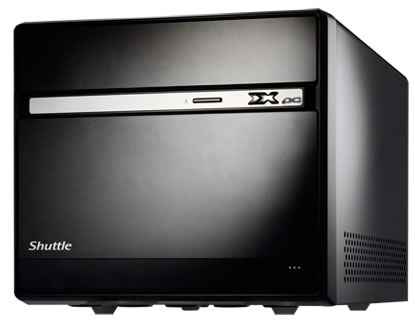
The Shuttle SH55J2 boasts a J2 design with a black chassis. The case is made of aluminum and the main body is made of steel, making the box a little bit heavy at 7.0kg (empty). It's overall dimensions are 33 x 21,5 x 19 cm (LxWxH). A full aluminum case would be great here but this would increase its retail price of the device.
The case offers enough space for 1x 5.25" and 2x 3.5" internal storage devices, but there is no option for a 2.5" SSD.
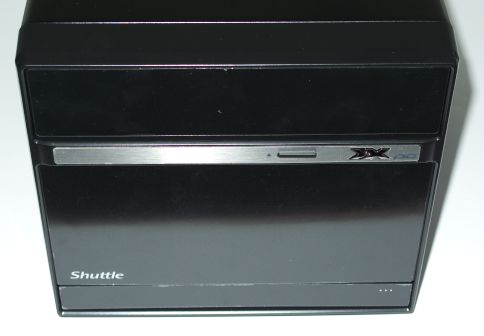
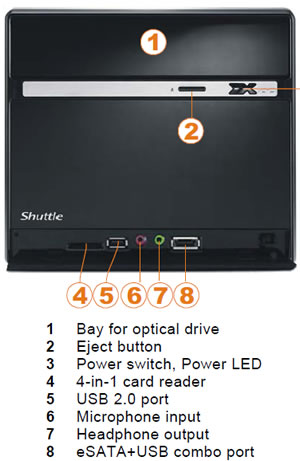
As you can see in the picture above, the front side of the device includes just the necessary buttons - the eject button for the optical storage drive and the power button, which is actually the "XX logo" you see on the right side of the front panel. Don't seek for a reset button or an HDD activity LED cause there aren't any.
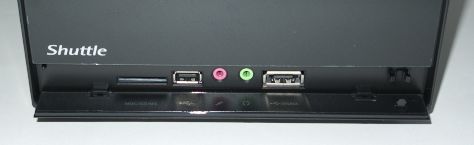
The front side also features some input ports. Just press the the bottom side front panel and the cover will open, unveiling a 4-1 card reader (SD, SDHC,MMC,MS Pro/Pro Duo/Pro-HG), a USB 2.0 port, microphone/headphone jacks and a e-SATA/USB combo port. We wouldn't mind having another USB port here..
The plastic cover is also a little clumpsy and we think that Shuttle could avoid using plastic here.
Ventilation holes are found in both sides or the device, allowing the hot air coming out of the device:
Below you can see the rear side of the device. There are two expansion slots for PCI and PCI-E cards and according to the device's specifications, you can also install two graphics cards.
All the screws found on the SH55J2 can be handled with hand, which is always very handy for users:
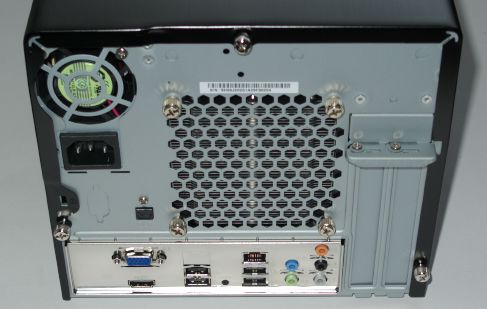
Zooming at the back panel area, we see:
- 1x HDMI (digital video out with digital audio)
- 1x D-Sub VGA (analog video out)
- 4x USB 2.0
- 1x GigaBit LAN (RJ45)
- 8-ch Audio line-out (2x rear/front, bass/center, surround/back)
- Audio Line-in
- Digital Audio: optical S/PDIF output
- A clear CMOS button
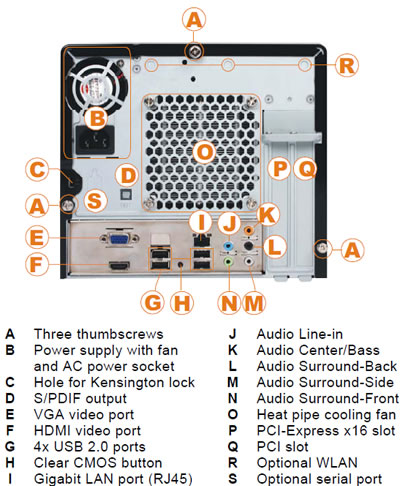
As happens with all "modern" cases, there is not any PS2 connector for mouse/keyboard. Once you use 2x USB ports for mouce and keyboard, only two USB ports will be left to connect your external devices. That's a problem since most currently sold devices are USB-based. On the bright side, the the motherboard has the option for 4x extra USB 2.0 ports. using an extra (not included) adapter.
Optional WLAN and a Serial port are also offered at the rear side of the device.
3. Internal
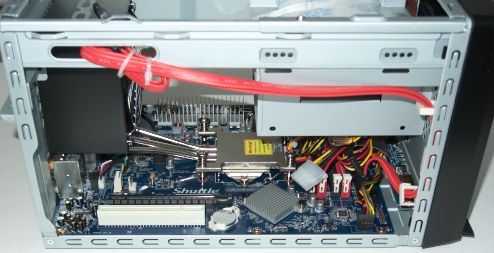
Opening the case is very easy since just three thumbscrews are keeping the external aluminum case in position. Of course, a philips screwdriver is essential in order to install the rest of the components. The SH55J2 is offering enough free space inside, since the device is a little bit larger in size compared other Shuttle boxes we have tested in past.
There are two more screws left to access the internal by removing the drive bay:

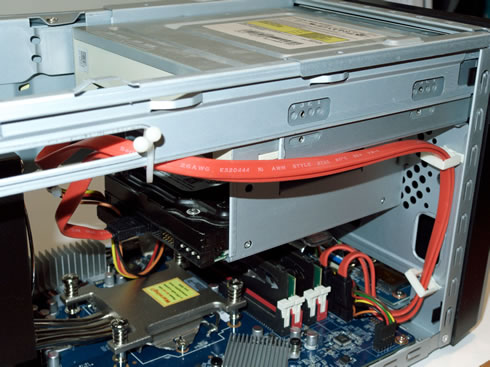
Moving south, we can see that the SATA cables are pre-installed. There are also two SATA 2 3GB/sec ports available in case you need them:
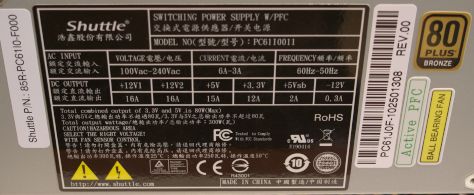
The installed power supply is rated at 300 Watt rated and carries the 80Plus bronze certification (efficiency). Two +12V rails with 16A are available. These are enough to power up three optical devices and a mid-range graphics card:

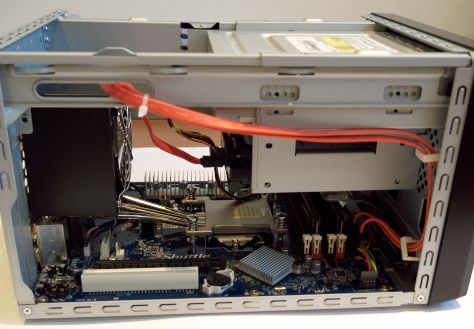
Below you can see the internal of the device with the drive bay removed:
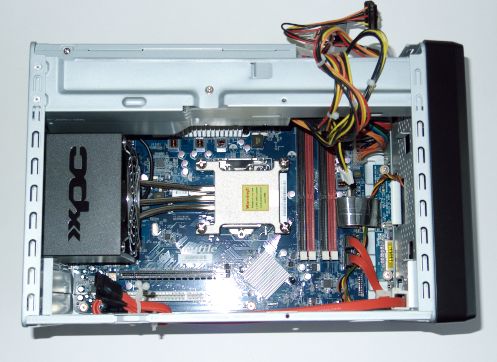
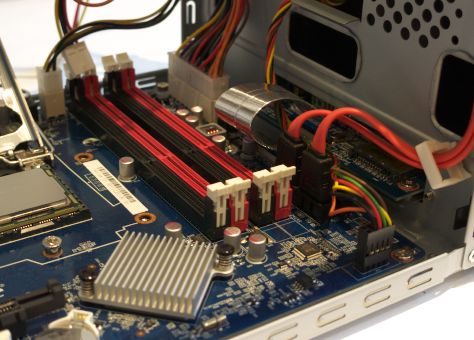
The motherboard has four memory banks where you can install 4 GB per DIMM, resulting to a total size of 16 GB of memory - more than enough for most users. The system supports DDR 800-1066 and 1333 memory speeds with an optional DDR3-1600 under overclocking mode, according to the specifications:
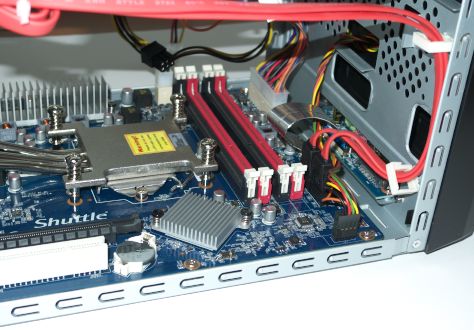
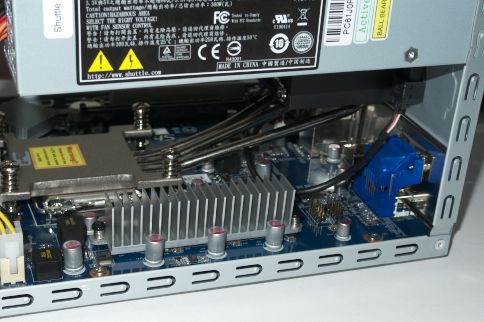
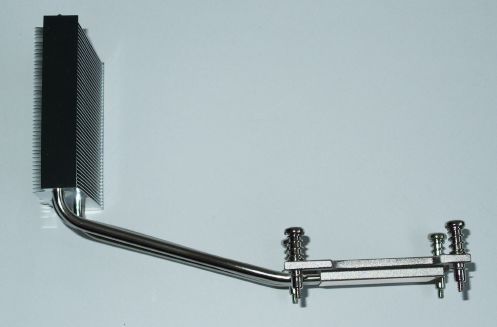
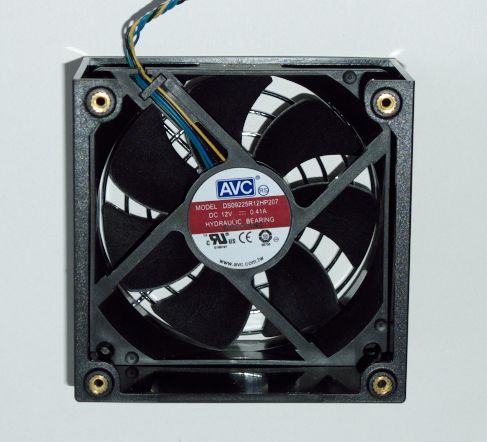
Four screws are keeping the installed thermal system in place. The thermal system is what we have seen in the past from Shuttle. A a copper base and three aluminum heatpipes transfer the produced heat to the rear side of the device, where a 92mm fan is responsible for cooling things down. The specific thermal system should be efficient enough for most users. Due to the design of the case, there are not many other aftermarket CPU coolers we could think of using after all.
Shuttle has included anti-vibration silicon at the fins to reduce the overall noise, and we must admit that it works pretty well.

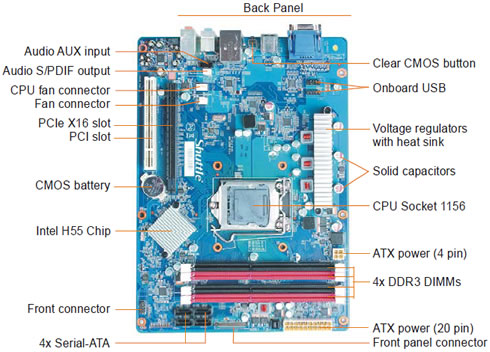
Below you see a clear view of the rear side of the motherboard, with the cpu cooler removed:

4. Installing the components
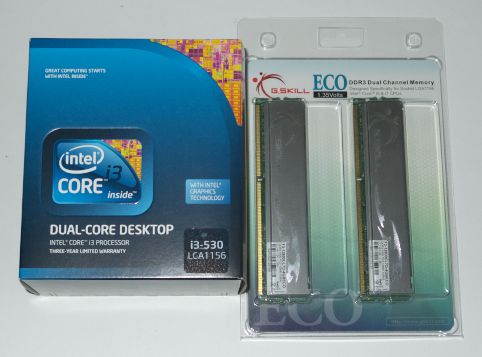
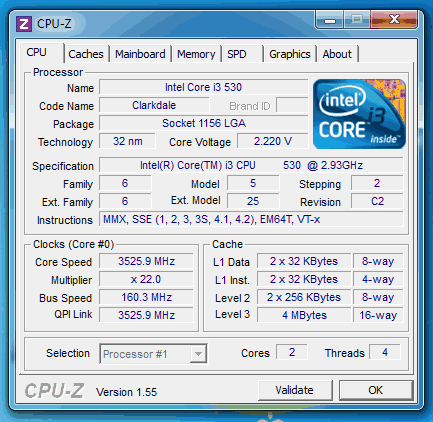
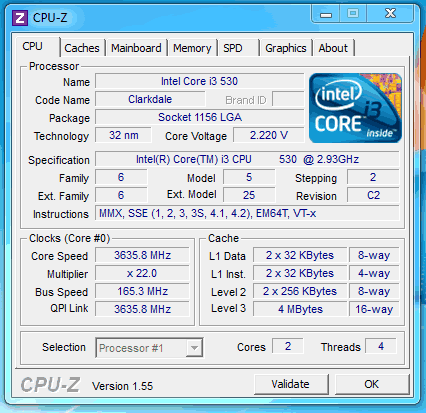
So what we need to have the system up and running? Probably just three components, a cpu, memory and a hard disk drive. For our tests, we used an Intel Core i3-530 processor and 2x2GB DDR3 memory by G-Skill:
The CPU should be handled with care and carefully put in place. There is only one direction you can install the CPU so you cannot make any mistake here:
Apply some thermal paste (included) and secure the Shuttle CPU cooler. It is advised to follow the X rule here to have the best results, meaning screwing diagonally:

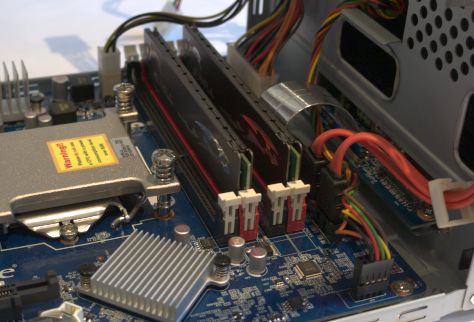
Installing the memory modules is also easy since they are properly colored:
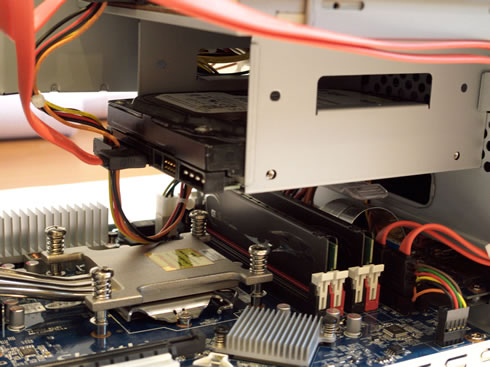
Before getting into the storage area, you need to arrange the SATA cables in order to easily reach the devices:

Installing a HDD and an optical device should be also very easy. The case is offering enough and properly placed holes for the installation screws you may need. The next step is to plug the SATA and power cables to the installed devices:
There is a lot of free space left between the SATA and ODD drives:
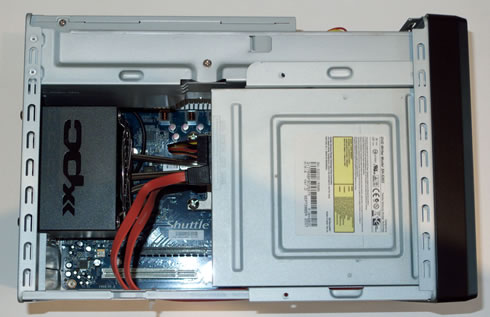
Here is a top view of the device:
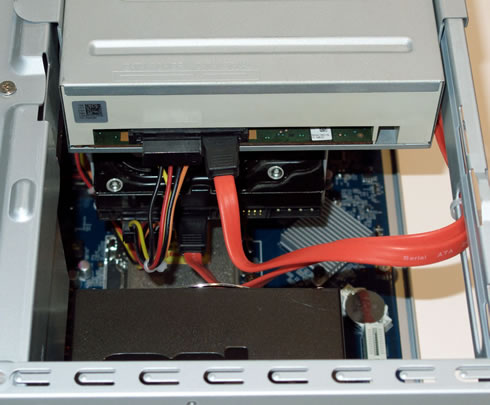
As you can see in the picture below the SATA cables are already fastened on the case with plastic bands so you may find it hard to make them reach the installed SATA device. So you may need to cut the plastic band and possibly fasten the SATA cables on the case again in a more convenient position:
Finally our system is ready to use:
5. BIOS setings
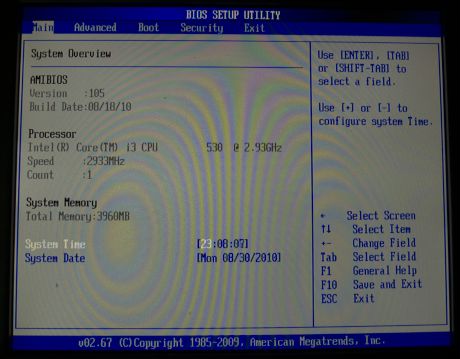
As you see in the picture below the device's BIOS settings are based on the structure of the popular AMIBios interface.
The first page provides information about the BIOS revision. Our box came with Ver. 1.03 bios and we then installed the latest available Ver. 1.05. The same page also includes information about the CPU and the installed memory:
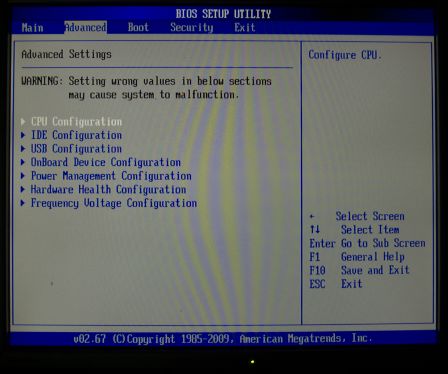
The most important settings of the SH55J2 are available under the "Advanced" tab:
We select the " CPU configuration" option where you can change the settings of your CPU. In our case, we can enable/disable the "Virtualization", "HT", "Speedstep" and "Turbomode" technologies. We can also set the maximum CPUID limit and select the number of the active cores of our CPU:

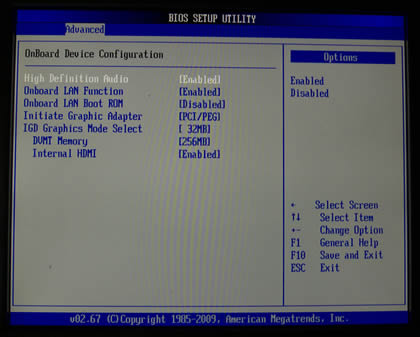
The " Onboard Device Configuration" section includes settings related to the graphics, HD audio and LAN:
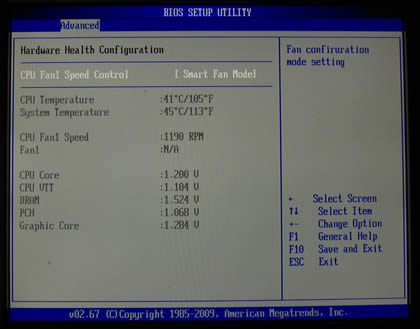
The "Hardware Health S" section offers important information about the cpu and system's temperatures. You can also set the cpu fan speed (smart, low, medium, high) and see the various voltages of the system:
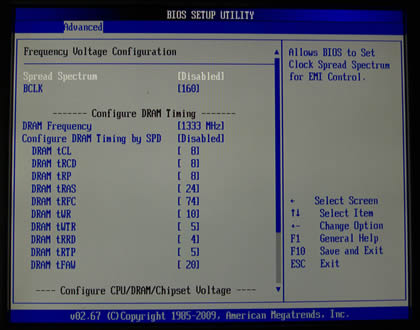
Last but not least, the "Frequency Voltage Configuration" section includes the BCLK speed settings that allows you to overclock your CPU.
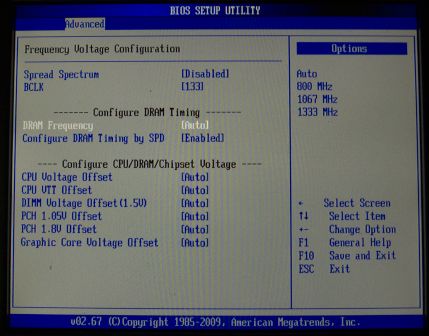
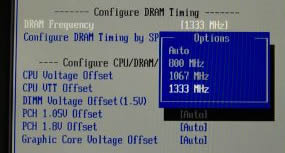
Here you can also set the DRAM frequencies. In our case, we were only given the option to set the memory at 800/1067 and 1333MHz:
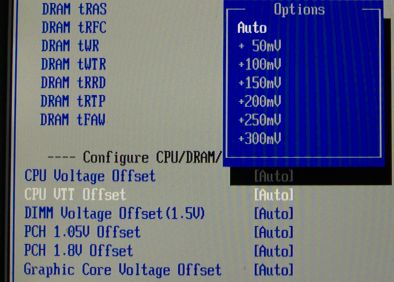
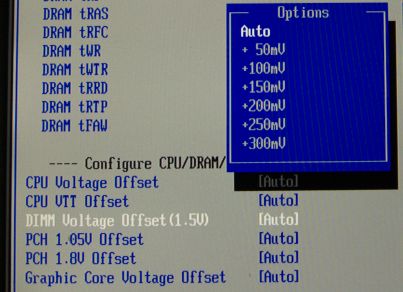
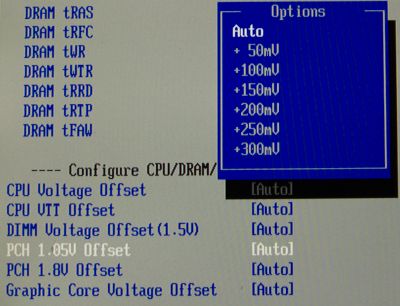
The CPU/DRAM/Chipset voltages are set by selecting the predefined + offset of the standard voltages, which is not very handy for serious overclockers:


6. Overclocking
Shuttle has positioned the SH55J2 barebone in the line-up as a mid-range machine. As such, the company does not
expect the SH55J2 to do any overclocking stunts. On the other hand, an overclocking attempt can be interesting since most of the Intel Core i3-i5 and i7 processors are highly overclockable.
Since Shuttle doesn't offer any Windows application for overclocking, we will have to dig under the "Frequency Voltage Configuration" sub menu of the BIOS to get things sorted. First, it is advised to disable the "Spread Spectrum" option. After that point you need to set the BCLK and then play with the DRAM frequency/timings according to the components you have installed to the system.
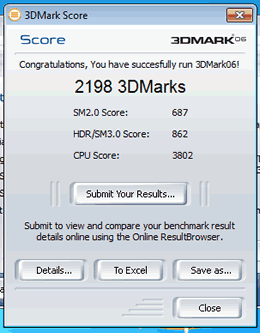
Our Intel Core i3-530 runs at 2.93GHz with a BCLK of 133MHz. That should be the first step in our overclocking quest. Quickly we increased the BCLK to 160MHz and we also set the memory running at 1333MHz with CL8 timings, without messing up with the system voltages. Our system was totally stable:
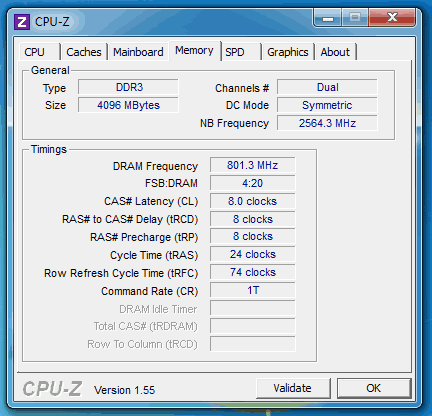


Our next overclocking attempt was to rise the BCLK to 165 & 170. Here things are getting tricky. First we had to increase the DDR timings to CL9, despite the fact that our memory was rated at just 1.35V @ DDR3-1600. We also increased the core's voltage and the VTT:


With the above setup the system was solid rock, tested with both the Prime95 or OCCT utilities. Increasing the BLCK to 170 resulted to a successful system boot but the system kept failing in both Prime95 & OCCT, which means that we had to stick to our previous overclocking settings.
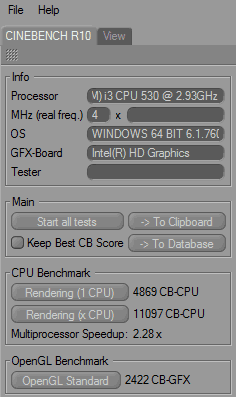
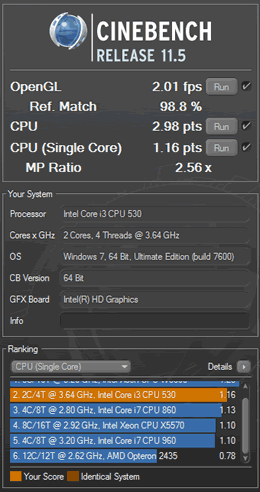
Comparing the above setup with the Core i5 and Core i7 processors, we can say that the performance of our CPU is good, for an affordable CPU such as the Core i3-530:


To sum up, you can overclock the Shuttle SJ55J2 to some extend by using the basic options and features provided by the specific BIOS revision. What we didn't like was the fact that the DRAM couldn't be set at DDR3-1600 and we couldn't set CL7, although our memory was pretty much capable for it.
In addition, the CPU running speed is not displayed by the BIOS when during boot up. Only the stock speeds are listed there, forcing you to enter the BIOS every time you boot in order to see which settings you have set.
We hope that Shuttle will release more updates for the BIOS as well as a Windows utility that would help you overclock the device easier.
7. Final words
The Shuttle SH55J2 barebone supports Intel's Core i3/i5/i7 processors and it is really a great value for your money. Paring the box with an Intel i3-530 is a really smart and affordable choice for having internal graphics with HDMI 1.3 support! Moreover, the overall features and specifications of the box make it ideal for users who need to upgrade their system without spending a fortune for a new box.
The SH55J2 is mainly made out of steel and this make it relatively heavy for its size but also keeps its retail price at low levels. The case can handle a dual slot external graphics cards without any problem and the included 300 Watt power supply unit should have enough juice to keep up with three internal storage devices. The device provides several inputs/outputs but we would like to see at least four USB 2.0 ports.
We also enjoyed the combo e-SATA/USB2.0 port and the 4-in-1 card reader found on the the front side of the box.
The system can work with up to 16GB of memory and that's a great feature that makes the difference compared to other barebones. In addition, even with all the components installed, there is free space left inside the box, allowing you to easily get all cables sorted for easy maintenance and also contributing to a more efficient ventilation of the system.
Passing to the performance, the system was solid rock under stock speeds and its internal fan was barely audible, meaning that Shuttle has done a good work with the acoustics. Users can "easily" overclock their processors provided that they know what they are doing. We managed to get an Intel Core i3-530 from 2.93GHz up to 3.64GHz under stock voltages and with the internal fan to spin moderately even at full load. The specific CPU and memory installed allowed us to push overclocking even more but the system turned out to unstable. Although the SH55J2 has not been designed for obverclocking, we hope that Shuttle will improve the BIOS features and optimize the system's overclocking performance.
To sum up, the Shuttle SH55J2 is a fairly priced barebone for what it offers: support for the Intel Core i3/i5/i7 processors, up to 16GB memory and decent overclocking performance. The box costs ~ €268 and if you are looking for a new SFF this should be a smart choice.
- Positive
- Solid manufacturing quality
- HDMI & VGA output support for dual monitor
- eSATA-USB combo port into its front panel
- Four memory banks with up to 16GB support
- Support for three storage devices
- Support for dual slot graphics card
- Enough room space to keep CPU temperature low
- Internal space is clean and tidy, you won't have problem installing all pieces together
- Has extra PCI and PCI-E slots for easy upgrades
- Shuttle offers expansion for WLAN/Serial ports but with additional cost
- Good overclocking abilities
- Installed 300Watt PSU with 80Plus Bronze rate
- Negative
- Retail price may sound high for entry-level users
- Steel case adds extra weight
- It's dimensions make it ideal for office use, not HTPC
- Only four (4) USB2.0 ports at the back
- Not included USB2.0 bracket for extra USB2.0 ports at the back
- Front plastic panel is clumpsy
- Pre-installed SATA cables could be longer
- Couldn't set DDR3-1600 under overclocking