1. Features
Among Shuttle's latest member in its Slim PC lineup is the DH110, a device designed for the Intel Skylake platform technology equipped with the new LGA 1151 socket and Intel 110 chipset. The slim PC supports Intel 6th generation Core i3/i5/i7, Pentium, and Celeron 65W processors (not included).
Designed to drive interactive commercial applications and support 4K/Ultra HD video content, the DH110 provides HDMI and DisplayPort to support dual-screen displays. Compared to Haswell/Haswell Refresh processors with 22nm process, the DH110 supports 14nm Intel Skylake processor to reduce power consumption and built-in new generation Intel HD Graphics even have better graphics performance. The DH110 supports DDR3L 1.35V low-voltage memory with a maximum capacity up to 32GB (16GBx2).

With a 1.3-liter slim design and body thickness of only 43mm, the DH110 can support 2.5" SATA 6G HDD or SSD and built-in one M.2 2260/2242 with type M and one M.2 2230 type A/E slots to install M.2 SSD and a WiFi card or other compatible devices.
The DH110 also includes multiple USB2.0, USB 3.0, and two RS232 (RS232 and RS232/422/485, both support 0V/5V/12V) for connecting thermal printers, label printers, barcode scanner, etc. Thanks for its Dual Intel Gigabit LAN ports provide high-speed data transfer capability and a better compatibility for business network environments as well as support WOL and Teaming mode function.

Compact, the DH110 is easily integrated into a variety of commercial applications. The device is 24/7 certified. It runs quiet and cool throughout extended use due to Shuttle’s thermal technology. Its slim metal chassis is VESA mountable and operational in 0-50°C ambient temperatures, making the DH110 ideal for automotive, digital signage, kiosk, and vending machine applications. Shuttle's recommended retail price is 226.00 EUR for the DS67U.
Specifications
- Mainboard / Chipset / BIOS
Chipset: IntelH110 Chipset
(IntelDH82H110 PCH, code name "Sunrise Point")
Platform Controller Hub (PCH) as Single-Chip-Solution
AMI BIOS in 8 Mbit EEPROM with SPI interface
All capacitors are high quality solid capacitors
Supports hardware monitoring and watch dog functionality
Supports Unified Extensible Firmware Interface (UEFI)
Supports power on after power failure
- Processor support
Socket LGA 1151 (H4) supports the sixth generation of
Intel Core i7 / i5 / i3, Pentium and Celeron processors
Maximum supported processor power consumption (TDP) = 65W
Codename "Skylake", 14nm process technology, up to 8 MB of L3 cache
Memory support
2x SO-DIMM slots with 204 pins
Supports DDR3L-1333/1600 (PC3-10600/12800) SDRAM at 1.35V
Supports Dual Channel mode
Supports max. 16 GB per DIMM, maximum total size of 32 GB
Supports two unbuffered DIMM modules (no ECC)
Notice:This mainboard does only support 1.35V DDR3L memory modules.
Note: DDR3L has a lower operation voltage compared to DDR3
- Integrated Graphics
The features of the integrated graphics function
depend on the processor type used.
Two digital video outputs: DisplayPort 1.2 and HDMI 1.4
- supports two independent Full HD displays simultaneously
- supports Full HD resolution at 1920x1200 (1080p/60Hz)
- supports 4K UHD resolution at 3840 x 2160 (max. 2160p/60Hz on DP or max. 30Hz on HDMI)
- supports Blu-ray (BD) playback with HDCP
- supports HD video plus multi-channel digital audio via a single cable.
Optional analog D-Sub/VGA video output
- M.2-2260 BM Slot
The M.2 2260 BM slot provides the following interfaces:
- PCI-Express v2.0 X4
- SATA v3.0 (6 Gbps)
It supports M.2 cards with a width of 22 mm
and a length of 42 or 60 mm (type 2242, 2260).
Cards with 80mm length (2280) are not supported.
Supports M.2 SSD cards with PCIe or SATA interface.
- M.2-2230 AE Slot
The M.2 2230 AE slot provides the following interfaces:
- PCI-Express v2.0 X1
- USB 2.0
It supports M.2 cards with a width of 22 mm and a length of 30 mm. This slot is intended for Wireless LAN (Wifi), Bluetooth, GSM/UMTS cards and others. A SATA interface for SSD cards is not available here.
- Audio
Audio RealtekALC 662 5.1 channel High-Definition Audio
Two analog audio connectors (3.5mm) at the front panel:
1) 2-channel line out (head-phones)
2) microphone input
Digital multi-channel audio output: by HDMI and DisplayPort
- Dual Gigabit LAN Controller
Dual network with two RJ45 ports
Used network chips:
1) Intel i211 Ethernet Controller with MAC, PHY and PCIe interface
2) Intel i219LM PHY connected to the MAC of the processor
Supports 10 / 100 / 1.000 MBit/s operation
Supports WAKE ON LAN (WOL)
Supports network boot by Preboot eXecution Environment (PXE)
Supports Teaming mode
- Drive connectors
1x Serial-ATA III, 6 Gb/s (600 MB/s) bandwidth
With Serial-ATA power connector (onboard)
- Other onboard connectors
1x jumper for power on after power fail (hardware solution) [8]
1x analog VGA graphics output CN6 (2x1-pin, 1mm pitch) [5]
2x serial interface (COM) occupied by back panel connectors
1x fan connector (4-pin) occupied by the cooling system
1x connector for CMOS battery (occupied)
2. Unboxing, DH110 details
The Shuttle's official price for the DΗ110 is 240 EUR. Below you see the package of the device, which is not much different from what we have seen with the company's products.

At the side, basic product information is listed:

The package includes the main PC chassis along with the rest of the accessories:
- The DH110 box
- A Multi-language user guide (EN, DE, FR, ES, JP, KR, SC, TC)
- A VESA mount for 75/100mm standard (two metal brackets)
- Four thumbscrews M3 x 5 mm (screws together VESA mount and PC)
- Four screws M4 x 10 mm (to affix VESA mount on the PC)
- Four screws M3 x 4 mm (to mount a 2.5" storage device into the bay)
- A Driver DVD (Windows 64-bit)
- A Serial ATA cable for 2.5" drive including power cable
- An External 90W power adapter with power cord
- A Protection cap for CPU socket (do not use if heat-pipe or fan is mounted)
- A Heatsink compound

Shuttle is also selling a universal WLAN-ac / Bluetooth Combo Kit with M.2 card (Realtek RTL8821AE) - a wireless LAN kit consisting of a M.2-2230 card, two antennas and appropriate cables. The WLN-M is intended to add wireless LAN functionality according to IEEE 802.11n/ac at 2.4 / 5 GHz. At the same time, his combo device also supports Bluetooth 4.0. Unfortunately, the package you see below will cost you some additional 38 EUR:


In order to get the box running you will need to install an Intel Socket 1151 processor, SO-DIMM DDR3 memory rated at 1.35V (be careful), a 2.5" HDD/SSD drive and Windows /Linux OS.. For our tests, we used a 16GB (2x8GB) CT2KIT102464BF160B memory kit (~80 EUR) and a BX200 960GB SSD (~303 Euro), both kindly provided by Crucial. Of course, you can save some cost by adding a smaller SSD or even a HDD. For instance, a Crucial BX200 240GB SSD costs about 82 EUR.
One of the advantages of the DH110 is its compact size. Measuring at just 190 x 165 x 43 mm (1.35 liter), it can be easily "hidden" attached to the rear side of a 24" LCD monitor. With the processor, memory and an SSD installed, the all-metal system weighs 2.1kg.
As you see below, ventilation holes in both sides of the device help the system remain cool while running 24/7:


The front panel includes a microphone input, an
Audio Line-out (headphone),
2x USB 3.0,
2x USB 2.0, an
SD card reader ( SD, SDHC and SDXC ), the Power button, a
power LED (blue) and an
HDD LED (yellow)


At the rear side there is a DisplayPort (DP) v1.20 and a full sized HDMI v1.4 port. You can also use the 1x D-Sub VGA connector (accessory PVG01), 2x USB3.0, 1x eSATA/USB2.0 combo port, 2x Gigabit Lan, 2x RS232 serial ports, 9-pin D-Sub (5/12V, 1x RS422/RS485) and a DC-input (supports 12V±5% or 19V±5%). In addition, you find a connector for external power button / clear CMOS (4-pin connector 2.54 mm pitch) and 5V DC voltage,
1x PS/2 combo port to connect a keyboard or a mouse,
2x perforation to attach optional Wireless LAN antennas and
2x holes for Kensington Locks:


3. Hardware and OS installation
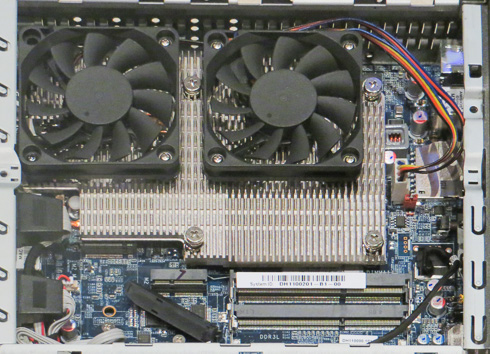
The chassis' top cover is held in place by two screws, so opening it up is straightforward. Just remove the screws and slide the cover backwards and upwards.
Below you see an internal view of the DH110. A massive heatsink covers the CPU socket area, and two 60mm fans provide the essential cooling. The next step is to unfasten the rack mount screw and remove the SSD bay:

Two SO-DIMM DDR3L memory slots were unveiled below the SSD bay. Next to the two SO-DIMM slots are the two M.2 connectors. One is the connector intended for storage and to theother is the one intended for wireless network or Bluetooth modules.
We removed the four ICE module attachment screws and unplugged the fan
connector. Below you see the cpu cooler, which has a full copper base that firmly touch the processor in order to dissipate the provided heat. Provided that you install a <65watt TDP socket 1151 CPU and an SSD, you can be assured that the DH110 will be running 24/7.

With the CPU cooler removed, we have a view of the bare mainboard Its basic components are listed below:


Let's make this baby run.
First you need to get 1.35V DDR3L memory modules. Be careful to select the right memory, otherwise the device will not operate. Locate the SO-DIMM slots on the mainboard, align the notch of the memory module with the one of the memory slot, gently insert the module into the slot in a 45-degree angle and finally gently push down the memory module until it snaps into the locking
mechanism:

The DH110 is compatible with the sixth generation of
Intel Core i7 / i5 / i3, Pentium and Celeron processors (Socket LGA 1151 H4). The maximum supported processor power consumption (TDP) is 65W. The selection of the CPU will also have an impact on the graphics performance of the DH110, since you cannot add a separate graphics card and you'll have to rely on the strengths of your processor's graphics engine.
For our tests we used an Intel Core i3-6100 LGA1151 processor. This dual-core CPU has been manufactured upon Intel's 14 nm process and is clocked at 3.70 GHz. It packs the HD Graphics 530 GPU and it is rated at TDP 51W:

Installation of the processor is easy. Just apply some thermal paste, carefully place the CPU on the socket and mount the cpu cooler.

For our tests we also installed the WLN-M M.2 Wifi accessory, which includes the WLAN module in a M.2-2230 format and offers IEEE 802.11ac/Bluetooth 4.0 connectivity. It may take you some extra time to get the two external antennas connected the right way.


The final step is to connect the SSD:

Shuttle suggests that the DΗ110 should be operated in vertical position, using the the supplied rubber pads under the chassis (DisplayPort output facing up). But the device can be also VESA-mounted behind an appropriate monitor using the included VESA mount kit. From a thermal point of view, horizontal operation is also permitted, although Shuttle does not provide rubber pads for the sides of the device. In an horizontal position, the device's maximum operating temperature is 35°C.
Bios / Installing OS
Shuttle is not providing an OS for the DΗ110, and offers drivers mainly for Windows 7/8/10. Of course, you may install your favorite Linux distro as well, such as Ubuntu.
We chose to install the Windows 10 OS. You should first create a Windows 10 installation USB flash drive, and enter the BIOS (pressing del at boot screen) in order to set the system boot from the USB drive. The installation was completed after several minutes and most of the internal components were recognized without needing to install additional drivers.
Shuttle is still sticking with an Aptio Setup Utility interface. The system is based upon AMI BIOS and its rather easy to navigate. The menus are available on the top area of the screen. The Main area shows details about the currently installed BIOS version, the installed processor and the amount of installed memory. Here you can also adjust the system's date and time.

The system was updated to the latest v1.04 BIOS. You have to use a DOS USB stick to be able to update it.

The Advanced area comes with the following sub-sections:
- Hardware Health Configuration
- OnBoard Device Configuration
- Power Management Configuration
- CPU Configuration
- SATA Configuration
- USB Configuration
Hardware Health Configuration sub-menu does show the live CPU/System temperatures, but also the current voltage for the CPU package and DRAM.
Through the OnBoard Device Configuration, you can enable/disable certain motherboard interfaces, including the audio CODEC, LAN ports, choose a function for the M.2 slot, allocate a certain memory section for the IGP and more.
The SATA Configuration area only displays the currently connected drives into the respective slots.
The Security menu allows you to change current Supervisor/User passwords, set the Password Login Control area, but also enable/disable Flash Write Protection.


4. CPU and memory benchmarks
Following the hardware installation, the system we are testing is configured as follows:
As Shuttle indicates, you can install Intel 1151 socket cpus, provided that they have <65watt TDP. As we previously showed, we chose the Intel i3-6100, which is a reasonably priced cpu that offers a lot of horsepower for everyday tasks. Keep in mind that the DH110 is not compatible with Intel Xeon E3 V5 processors for socket LGA115 , older LGA 1150 processors, and does not support the unlock-function of Intel K-Series.


The installed Crucial Memory runs at 1600MHz @CL11:


The CPU-Z's benchmark gave us a rough idea of what to expect from the Intel i3-6100:

Below you se more benchmark statistics of the i3-6100 and comparisons with other desktop CPUs, according to the online PassMark software archive:

The Passmark 8 returned an overall score of 3210 points for our current DH110 setup..Not bad at all!

Below you see the system's score with PassMark 9:

The AIDA64 Extreme Memory tests unveiled a great performance for our memory:

The CineBench benchmarks also offer many performance figures and good comparisons, just click on the links to get them:
| |
|
|
|
| CineBench Rendering 1 CPU |
7724 |
1.77Pts |
155cb |
| CineBench Rendering x CPU |
17281 |
4.41Pts |
395cb |
| OpenGL Standard |
10150 |
39.52 FPS |
43.14 |
The PCMark 7 awarded the Shuttle DH110 with an overall score of 6080:

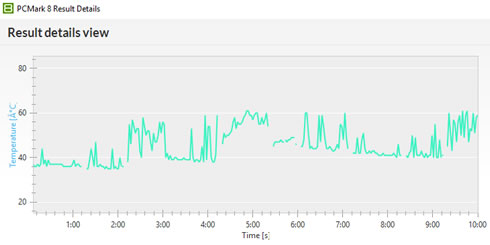
Below you see the PCMark 8 test results:


Looking at the CPU temperatures during PCMark8 benchmark, we notice that most of the time,
The cpu temperature during the PCMark8 benchmark was kept below the 60 degrees Celsius, confirming that the installed cpu cooler does a great job even under intense workloads, while remaining relatively silent:
5. GPU benchmarks
The Intel i3-6100 CPU we have installed is featuring the Intel®HD Graphics 530 engine. The graphics base frequency is 350 MHz, and its max.
dynamic frequency is 1.05 GHz. The engine supports
4K at 60Hz and can output 4096x2304@24Hz video from an HDMI 1.4 port.
The GPU-Z utility provides some additional info:


The Intel HD Graphics 530 supports up to 1.024GB of
dynamic, shared memory, which is of course is "removed" from the system's main memory.
The PassMark 8 software provides an estimation of the chip's graphics "power". You really shouldn't expect any serious performance from an integrated GPU. It seems that HD 530 is more powerful than an Nvidia GT630 and is also a a lot faster than the Intel HD 4000:

The FutureMark 3D benchmarks returned the figures you see below - a typical performance for this category of graphics engines:
Test |
Result |
| 3D Mark 05 |
17009 |
| 3D Mark 06 |
10388 |
| 3D Mark Vantage |
6175 |
| 3D Mark 11 |
P1631 |
| 3D Mark Sky Diver |
3808 |
| 3D Mark Time Spy |
321 |
In regard to gaming, you should expect some acceptable performance (FPS) with DX9 games running at medium-quality settings and and probably up to resolutions of 1280x720p.


6. Audio and Video tests
Although the Shuttle DH110 ha been designed to be used for commercial applications, its small size combined with its HDMI output could make it a potential solution for using it as a media player as well.
The box has two digital audio/video ports to drive two independent screens:
1) DisplayPort 1.2 supports 4096x2304 @ 60Hz and
2) HDMI 1.4 supports 4096x2304 @ 24Hz. Both outputs support Ultra HD / 4K resolution video, Quick Sync Video and Clear Video HD technology.
For our Audio/Video compatibility tests we used the following setup:
TV: Panasonic 55CMX710E (4K +3D capable) with the latest firmware installed
A/V Receiver: Yamaha RX-V775 (7.2 capable) with the latest firmware installed
Wifi Router: TP-Link VR200 (802ac,b,g,n) with the latest firmware installed
We used several audio/video files from KODI Wiki. We also used the latest K Lite Codec pack and the Kodi platform.
According to its specs, the HD 530 supports full H.264, H.265 8/10 bit, VP8/9, VC-1, AVC hardware decoding, along with HD video plus multi-channel digital audio via a single cable. We connected the Shuttle DH110 to our Yamaha RX-775 A/V receiver through an HDMI cable.
Note that in order to get automatically proper display scaling, we had to set the resolution to 3840x2160x23p. The 4096x2160x23p produced wrong scaling and we had to drop the horizontal scale to 50% under the Intel display properties. Under Windows 10, it looks like the only 3D capable resolution was the 1920x1080p. The device locked at 23.975 fps with any video playback software we tried.
In order to get HD Audio you need to make some settings first. At the Media Player Classic (part of the K Lite Codec) you need to set the external filters . In KODI, you'll have to set audio to WASAPI HDMI of the TV Display and at 7.1. At the same time, you'll have to enable all the corresponding modes of your A/V Receiver.
Audio HD Tests (Shuttle DH110) |
| HD Audio |
K Lite Codec 12.3.0 |
Kodi 16.1 |
|
PCM 2.0 at A/V Receiver |
PCM Passthrough (7.1 at A/V Receiver) |
|
|
|
Dolby AC3 5.1 |
Yes |
Yes |
|
Yes with some audio drops |
|
Yes |
|
Yes TrueHD at A/V Receiver |
Yes (TrueHD at A/V Receiver) |
|
|
DTS-HD HRA 5.1 |
DTS-HR HI-RES at A/V Receiver |
DTS-HR HI-RES at A/V Receiver |
DTS-HD HRA 7.1 |
DTS-HD MA 5.1 |
DTS-HD MSTR at A/V Receiver |
DTS-HD MSTR at A/V Receiver |
DTS-HD MA 7.1 |
DTS:X 7.1 |
As you see above, the audio compatibility was perfect. With KODI we easily got HD-Audio pass through along with a perfect audio playback; with the Media Player Classic you only get PCM 2.0 with AAC/LPCM formats. So using KODI is highly recommended.
Video Bitrate Tests
For this test we used a test file available at this page. The player was tested with up to 400Mbps files using all the possible sources:
Based on the Intel HD 530 graphics engine, the Shuttle DH110 maxed up to 250Mbit H.264 files. What you will not get is support for 10bit H265 files, as we experienced an unstable video playback. So you'd better connect the device through LAN (1Gbit) or even Wifi, as long as your system supports the 802.11ac mode (5GHz). Generally, the results here are good.
4K Tests x264 (AVC)
| Shuttle DH110 4K H264 Files |
| Test Clips |
K Lite Codec 12.3.0 |
Kodi 16.1 |
| 4K 10-bit H.264 video sample @ up to 160 Mbps |
Jerky playback |
jerky playback |
| 4K-HD.Club-2013-Taipei 101 Fireworks Trailer (AVC, High@L5.1, 29.970fps, 2 Channels AAC, 100mbps bitrate) |
Yes |
Yes |
| 4k_QHD_RoastDuck_30p (AVC, High@L5.1, 29.970fps, 2 Channels AAC) |
Yes |
Yes |
| big_buck_bunny_4k_H264_30fps (AVC, High@L5.1, 30 FPS, 2 Channels Mp3) |
Yes |
Yes |
big_buck_bunny_4k_H264_60fps
(AVC, High@L5.1, 60 FPS, 2 Channels Mp3) |
Yes |
Yes |
| Ducks Take Off [2160p a 243 Mbps] |
Yes |
Yes |
| linkin_park_ultra-hd (H264, 50-60fps) |
Yes |
Yes |
| NoiseRed-25fps-SlowMotion-120mbs (AVC, High@L5.1, variable FPS) |
Yes |
Yes |
| Ducks Take Off [2160p a 243 Mbps] |
Yes |
Yes |
Sony_Alpha_7R_II_video-test-4K (H264, up to 30fps) |
Yes |
Yes |
| Snow Monkeys in Japan 5K Retina 60p (Ultra HD) (2160p 30fps) |
Yes |
Yes |
| BluRay 1080p AVC DTS-HD MA 7.1 x264 file (AVC, High@L4.1, 6 000 Kbps, DTS-HD MA 8 Channels) |
Yes |
Yes |
| [1080p][16_REF_L5.1][FLAC_5.1]Suzumiya Haruhi no Shoushitsu BD OP |
Yes |
Yes |
The Shuttle DH110 showed perfect playback capabilities with most H.264 encoded files. The only issue we saw was a problematic playback with a 4K 10-bit H.264 video sample @ up to 160 Mbps.
4K Tests x265 (HEVC - 8 Bit)
| Shuttle DH110 4K H265 Files |
| Test Clips |
K Lite Codec 12.3.0 |
Kodi 16.1 |
Astra-11112_H_22000-Fashion TV UHD Demo 42.6 Mbps bitrate (8Bit HEVC) |
Yes |
Yes |
| Beauty_3840x2160_120fps_420_8bit_HEVC_MP4 |
Yes |
Yes |
| DivX-HEVC-UHD-4k_QHD_RoastDuck_30p |
Yes |
Yes |
Fifa_WorldCup2014_Uruguay-Colombia (8Bit HEVC) |
Yes |
Yes |
| Hispasat-10730_V_30000-Hispasat 4K HEVC 65.3 Mbps bitrate (8Bit HEVC) |
Yes |
Yes |
| Sintel_4k_27qp_24fps_1aud_9subs (8Bit HEVC) |
Yes |
Yes |
| LG Demo DolbyVision Comparison |
Yes |
Yes |
The system also showed a great compatibility with the H265 videos we tried, and had no problems with all the 8bit files. However, due to a limitation of the Intel HD 530 engine, the DH110 cannot playback 10bit or 4K VP9 videos properly.
We also tried to get 3D playback using both the Media player classic and KODI, but we encountered many problems...
Overall we are pleased with the performance of the Shuttle DH110 combined with the Intel i3-6100 processor.
7. Summary
Shuttle’s XPC slim DH110 is a little machine that can come in handy in many areas, whether you are needing signage or kiosk applications, whether you are deploying IoT systems throughout your production line, or you’re a home user that wants a media or office PC.
The DH110 is a barebone system, meaning it comes without CPU, memory, HDD/SSD and OS.. This means that a possible buyer should bear the extra costs in order to get the system running.
The system comes with a great CPU support up to i7 Skylake CPUs. There is a limitation for your CPU though - the 65W TDP- but it still allows for a great amount of power. For our tests, we installed an the Intel i3-6100 CPU, which is a fair solution offering a good price/performance ratio. Besides that, we used 2x8GB Crucial SO-DIMM with DDR3L low voltage memory (users can install up to 2x16=32GB), and an SSD. The only little downside in the design, at least for some, is the DDR3 only support instead of DDR4. Then again, in a system like this, it really won’t make a large difference besides the power consumption. The good thing on the memory side is that the system supports dual-channel memory setups, something that is a necessity for proper 4K display.
A typical configuration for the e XPC slim DH110 would be:
- Barebones street price: $255
- Configuration: Intel Core i3 CPU, 16GB RAM, 128GB SSD, and Windows 10: ~$620
The Intel H110 chipset is also plenty on the feature side for a system like this. Connectivity options include USB 3.0, USB 2.0, COM ports, and a PS2 port. This allows you to connect pretty much anything to this system from peripherals and storage drives to bar code readers, scanners, and anything else that fit the ports. It also comes with a built-in multiformat card reader.
The DH110 comes with both DisplayPort and HDMI out for multi-monitor output up to a 4K resolution. Another good feature is the dual LAN connection, which supports teaming and link aggregation. It also opens up more functionality for the system where two networks have to be served simultaneously or data has to be filtered such as in a hardware firewall or router.
More over it has two extra slot for M.2-2260 BM and M.2-2230 AE cards. That increases your storage options if you need some additional space. And if you need WIFi connectivity, Shuttle is selling the the WLN-M module in order to get 802.11ac / Bluetooth onboard. However, this costs some extra $42.
The retail package also includes a stand or a VESA adapter, allowing you to "hide" the DH110 under your monitor.
In terms of performance, the Intel i3-6100 CPU we have chosen to install to the system covers your your 2D needs (office, photo/video editing) and the the onboard HD530 graphics card offer you with basic DX9, DX11 gaming at low resolutions and with medium details. But even if you choose to install an i7 processor, you won't get a stand-alone graphics performance.
We liked the fact that the Shuttle box can work together with KODI 16.1 very well and that it is able to playback HD Audio (7.1) and up to 4K digital content. However, due to Intel hardware limitations, 10bit encoded files are a no-go with Intel HD graphic cards.
In addition, when the machine works at serious load, some noise may be introduced by the CPU cooler's fans. However, they are very efficient, and combined with the ventilation holes on the chassis, you are are rest assured that the system is set for 24/7 operation.
The Shuttle DH110 has been designed from the ground up to offer enough power for interactive commercial applications and 4K video. If you want a fancy gamer hardware case, the DH110 isn’t for you. But when the case size matters because it needs to fit into unusual places, or on the backs of monitors and TVs for digital signage, the Shuttle DH110’s small size will come in handy.

Visit Shuttle Europe
Positive
- Complete retail package
- Tiny 1.3-liter chassis-size
- Supports up to i7 Skylake CPUs with <65watt TDP
- Supports 32GB Dual-channel memory
- Build quality
- Many I/O ports (USB2.0, USB3.0, HDMI, DisplayPort, 2x1GBit Lan, COM1/COM2)
- Supports M.2 2260 BM + M.2 2230 AE slots
- Low cpu temperatures even at full load
- Basic gaming is possible with i3-6100 + HD530 graphics card
- VESA-mountable
- Dual Intel LAN with teaming and WOL support
- Intel HD graphics can be used for up to 4K playback content
- HD Audio passthrough works great (up to 7.1)
- Kodi 16.1 works great
Negative
- Included HDMI port is v1.4 (4K @ 24Hz) and not 2.0 (4K @ 60Hz + HDR)
- Retail price could be lower, provided that you need memory+SSD+operating system to get things working
- Wifi/BT module sold separately