Freecom Beatman Flash MP3 Recorder
4. Working with the Flash Recorder
Review Pages
2. Retail Package
3. Bundled Software
4. Working with the Flash Recorder
5. Tests
6. Conclusion
The Flash Recorder stores the audio/data files in flash memory. The sample that arrived in our labs had a capacity of 128MB, but Freecom also produces 256MB and 512MB models. While 128MB might appear small to many of you, you can easily store about 3-4 hours of music. This depends mostly on the bitrate of the stored music. The larger the bitrate/quality of the mp3/wma files you store, the less playback time will be available. So if you feel you have greater needs for storage space, you can go for the larger capacity models. Apart from the difference in storage space, all models in the series are identical.
The main advantage of players that use flash memory instead of a CDROM reader is completely flawless playback without skips. Since the player does not have any moving mechanical parts (like the optical pickup that a CDROM reader has), there is no need for skip protection mechanisms. Playback is smooth, and skipping between tracks is almost instantaneous. So you can use the player without annoying skips while jogging, or doing any activity that requires rapid movement.
There is another advantage as well, that stems from the lack of mechanical parts. Power consumption is much less than a CDROM reader based player. This is the case with the Beatman Flash Recorder as well. It operates on a single AAA size battery, which will give you many hours of playback time. In our tests using the included Duracell battery, we managed to get a little more than 10 hours of playback. As stated in the specs as well, listening to FM radio consumes even less power, so you will get more playback time than that one mentioned above.

As for the Flash Recorder itself, it is controlled with two small jog dial buttons, both located on either side. Both buttons can be scrolled up or down, and they can be pushed towards the inside. All the Flash Recorder's functions are controlled from here. The user manual that is included, both in print and in electronic form, is quite explanatory and will help you configure and use the Flash Recorder's functions without much hassle.
 Left Side
  Right Side
On the top side, we can see the earphones, line-in and USB connectors along with a selection switch and the builtin microphone. The switch selects between music, FM reception and the middle position ("HOLD") in which all the device's controls are locked so that nothing is accidentally pressed while listening. The USB with the line-in connector are protected by a plastic cap.

On the front side, we can see the LCD screen, which is backlit with a nice neutral blue light.There are two buttons on the front. The one on the top named "RECORD" can be used to start recording audio instantly to the device. The other button on the left named "EQ/PRT" can be used to change the equalizer settings. There are 5 presets, plus one more which is user configurable.

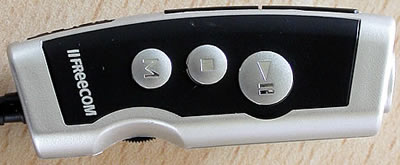
As for the wired remote control, it gives the ability to control most of the Flash Recorder's functions easily without having to reach for the device. You can adjust the volume, pause/play the current song, skip back/forward the current song, change equaliser preset. There is a hold switch here as well, that you can use to lock the buttons and avoid having them accidentally pressed. One thing you should bear in mind is that the remote's volume control is analog, and is independent from the volume setting of the Flash Recorder's. So if you experience low sound output from the earphones when the remote control is connected and the volume setting on the device is at maximum, check the volume setting on the remote control as well.


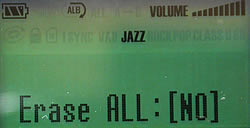
Below you can see snapshots from the Flash Recorder's menu functions:


Review Pages
2. Retail Package
3. Bundled Software
4. Working with the Flash Recorder
5. Tests
6. Conclusion

