Thermaltake Element V Case review
3. Installing the components
Review Pages
We are ready to open the case and install everything we need to power the PC up. As you see in the picture below, the case offers plenty of free space inside for the motherboard. Five cages for 2.5" devices and 6 cages for 5.25" devices are available:

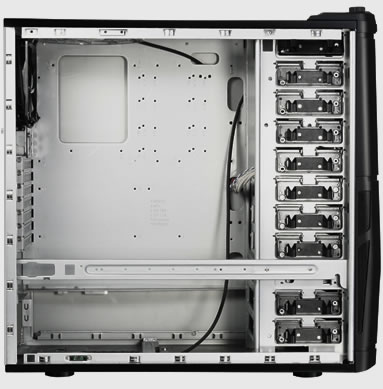
Removing the right side panel unveils the cables of the control panel:

With all this free space available, building the system is very easy. We installed the motherboard very easily guided by the conveniently marked positions for the required standoffs. As always, the installed standoffs should be aligned properly with holes in the motherboard.
Around the motherboard area there are many holes that you can pass the cables through them and avoid the usual cabling mess up you may have experienced with other PC cases:

Thermaltake has carefully designed the HDD bays so they can be easily extracted from the main case. Just press the clip using two fingers and there you go. However, the HDD needs to be secured with traditional screws. A tool-less design would be very handy here.
The Thermaltake Element V Case also supports the installation of a 2.5" storage device (such as an SSD) at the bottom cage.


The 5.25" devices are much easier to install. Again, apply some moderate force to the clip, place the drive into the cage and make sure it is in the right place with its side holes properly aligned with the external black clips:

After spending something installing the top I/O and the power supply cables, we have a good idea of what this case is offering. The holes on the back plate are very handy, allowing you to easily pass the essential 24pin/4+4pin power cables through them. In addition, there is enough free space left between the back plate and the front side of the case to gather the top I/O cables there and have less cabling at the motherboard's side:

What we didn't like was that the USB cables that should be connected to the top control panel are not joined together. This means that you should read the motherboard's manual carefully in order to make the right connections.
Finally, here is how our system looks like after having installed the power supply unit, the motherboard, an Nvidia GTX 460 graphics card an ODD and a HDD. Although we did not arrange the cabling properly for a clean look, there is a lot of space and many options to further hide the cables if you like. Using a modular power supply unit could free up even more space:

Due to the placement of the power supply unit and if you wish to benefit for the extra space behind the back plate, make sure your PSU's power cables are long enough. And don't forget that the case supports installing even big power supply units (>1000Watt).
Here is the system up and running in the dark. The top side and the light up to different colors, which can be also completely turned off completely by pushing down the speed-fan controlling knob on the top panel.


Although you cannot easily realize if from the picture below, the power led at the top I/O panel is very bright and rather annoying :)


Review Pages


