Thermaltake Silent Water
2. Installation
The first thing to keep in mind before proceeding to buy a new CPU cooling system, is how easily the new cooling system can be installed into the existing setup. In the case of the "All in one CPU Liquid Cooling - Silent Water", you need to have adequate space in your PC case to house the 120mm radiator and fan. According to Thermaltake, 163 (L) x 121 (W) x 35 (H) mm of space are required for this.
There are various installation options...

Placing the radiator at the back of the PC case where there's usually a place for an extra fan, requires a little more space than just for a 12cm fan.


In our case, we didn't have enough space at the rear, so we placed the radiator as shown below...

The retail package for the "All in one CPU Liquid Cooling - Silent Water" includes all the appropriate components to install with 775, 478, K7 and K8 sockets.

We will be trying it with 775 and 939 based motherboards...
Before placing the Silent Water onto the 775 and K8 CPU, you'll have to screw one of the two large mounting brackets onto the Brazing Copper CPU Water Block, as shown below...
 |
| Brazing Copper CPU Water Block with the bracket |
In the case of a 939 socket, remove the stock plastic base in order to install the "All in one CPU Liquid Cooling - Silent Water". Note that there is no need to remove the motherboard from the PC case.
 |
| The 939 socket with the stock mounting system |
 |
| ...remove the plastic base... |
Attach the Brazing Copper CPU Water Block and install the original mounting screws into their previous position. Simple...and fast.
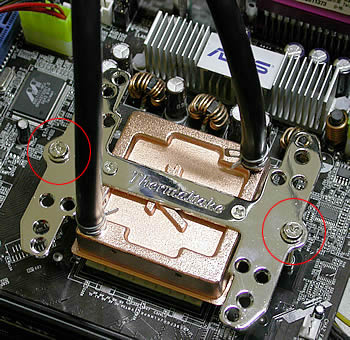 |
| ...just reseat the original mounting screws... |
In the case of a 775 socket, things are much more complicated, mostly because the motherboard has to be removed from the PC case, something that requires time. So...
Place one of the two large mounting brackets and the four long screws onto the back of the 775 based motherboard :
 |
| ...one bracket and the four large screws from the back... |
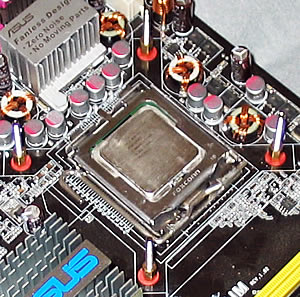 |
| ...and tighten the four screws from the front... |
As soon as you have done this, place the Brazing Copper CPU Water Block with the bracket onto the CPU and use four

You are now almost finished. The only thing that remains, is installation of the fan speed regulator. The regulator will also add to the look of your case. It only requires a slot at the back of the case, which means a PCI slot will be relinquished.


The black/red wires have to be connected to the small connector found on the cooler's base, as shown below:

The Silent Water cooler has a white coloured insulating tube (1) which includes two connections, a pair of wires coloured black/red for the power supply (2) and one single yellow with a pin connector for fan speed monitoring (3).

We then install the Silent Water radiator and fan in our PC case and it is ready for action.


