Acard ARS-2033N 1-to-21 Duplicator
2. Installation
We took all the components out of their boxes and started to read through the manual. The manual is adequate, although when reading through the first time to try and understand how the components connect together, it was a little confusing. This is probably due more to the procedure itself rather than the manual, but I did find it clearer to use the connection configuration tables in the manual (which are reproduced below), when connecting the controllers together.

Up to three controller boards can be connected together. Each board can handle up to 7 optical disk drives (ODD), providing a maximum of 21 drives when 3 boards are used. All controller boards are identical, so one has to be designated as the host controller and the others the targets. We also set up a configuration with just one controller board handling 7 ODD and it worked just fine.
To designate a controller board as the host, you need to short out the CN2 jumper pins. This is left open circuit on the target boards. The following pictures show an above-board view and the front panel respectively.


When connecting more than one controller together, only the host controller's front panel is used. We will discuss the front panel functions in a while.
To connect the boards together, you need to use the AEC-4430H SATA converter boards. The picture below, shows the 3 controller boards connected together using the SATA converter boards. The centre board is the host controller and connects to two SATA converter boards which in turn connect to the target controllers.
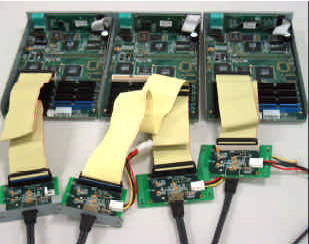
It would have been nice if the functionality of the AEC-4430H SATA converters had been incorporated on the controller boards. Already there's a clutter of cables building up, and we still have the drives to connect. Another issue that soon became apparent, was the power supply. Not in the sense that it couldn't handle the load, but we needed a lot of connector cables. Each controller card requires one power connection, each SATA converter board requires power, and then there are the ODD and the hard disk, which we haven't mentioned yet. That's a lot of cables. Don't forget that there's an IDE cable running off to each ODD as well, so you can imagine the problems with the layout.
Fortunately, you can order your duplicator through an ACARD distributor, so your unit will come ready connected in its cabinet. In our case however, we had to improvise a little. We used a regular ATX power supply. ACARD recommends it have a 300W rating or better. Now, if you take any standalone PSU, plug it into the mains and just feed of its 4 pin power cables, there's no power. The PSU doesn't automatically turn on and there's no way to turn it on or off, as is. In our test setup, we connected a switch between PS_ON and ground on the 20 pin Molex Main Power Connector. This is the wide connector that you would normally connect to your motherboard which in turn controls turning the PSU on and off. The PS_ON pin is (usually) the green cable.
Now that we had power, we connected a DVD ROM drive (Toshiba-Samsung SD-M1912) and a HDD to our setup. Before you can do any copying, you have to be able to read from somewhere (a source), the image or compilation you're going to copy. The ARS-2033N can read from a CD or DVD drive, or you can use a hard disc. The photo below shows a HDD and ODD connected to the controller. The ODD connected is used only as a reader by the controller, so you can use a DVD ROM drive instead of wasting a burner here.

We used both devices in our tests and can recommend the following. If you use the CD or DVD drive as the source, you will be limited in speed since copying is carried out on the fly. So this is good for a small number of copies only. If you're going to be doing a large production run, then you definitely need to use a hard disk. The hard disk and CD or DVD drive connect to the same IDE cable off the host controller. In fact, the IDE cable used, is the only one with 3 connectors on it, all the others have two. (All cables are supplied by ACARD).
Both the HDD and ODD are connected to the controller simultaneously, and in fact you use the ODD to transfer the contents of your project to the HDD. If you don't have an ODD reader connected to the same cable as the HDD, you can still copy your project onto the HDD using one of the burner drives. The system is intelligent enough to be able to detect if a drive has media inserted and can then use that media to copy onto the HDD. However, we recommend using a DVD-ROM drive, which tend to offer better reading performance, especially with problem or defective media.
The next step, was to connect the burners. One important point to note here, is that you need to use the same make and model ODD for all burners, or at least that's what's recommended. This has to do with the command set and response times. We carried out some test runs using just a single controller board and 6 drives, not all of the same model. They were from the same manufacturer however, NEC, and included the ND-3540A, ND-4550A, ND-3520A and ND-3530A.
We had no problems in what was quite a good test run (a batch of 250 CDs). But beware of mixing drives. If you must mix drives (can't think of a reason why you would want to), you need to be absolutely certain of their compatibility. The real question however, is which model burner to use. This depends entirely on the type of copying you will be doing. Will it be on CD, DVD or both? What speeds will you be copying at. You're also better off selecting a good, reliable burner rather than choosing a mediocre one, simply to get a higher writing speed. Another major decision is the media brand you intend using. One of the greatest factors that impacts on the quality of a burn, is the combination of burner and media brand.
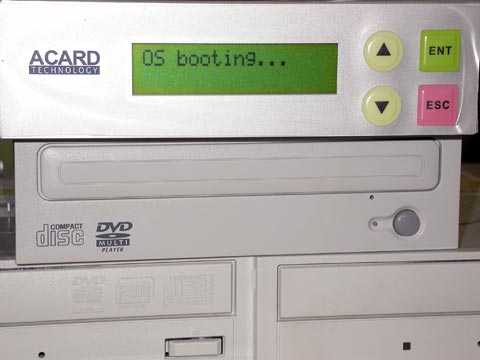
The following photo shows our setup with the ARS-2033N host controller front panel on top of our array of ODD. The topmost drive is the DVD ROM source drive, while below we had our DVD burners set up in two columns.
