Prassi PrimoCD Pro8 CD-R Software
5. Drive Tuning
Review Pages
PrimoCD Pro Pro 8 v1.1.317 - Page 5
Drive Tuning:
The Drives Tuning option under the Tools menu provides you with a means
of easily modifying the settings of all of your CD-R and CD-ROM drives simultaneously.
This screen is arranged into 4 columns. The first column indicates the drive by its name, SCSI Host ID, SCSI Drive ID, and Drive Letter. The second column lists the status of the Disconnection Option for each drive. The third column lists the status of the Synchronous Data Transfer Option for each drive. The final column lists whether Auto-Insert Notification is enabled or disabled.
You may handle each drive individually in this screen by clicking on the drive and selecting the ON or OFF button for each option, or you may select multiple drives by holding down the CTRL key and clicking on each drive. You may also click the first drive, hold down the Shift key, and then click the last drive, and all drives between will be selected. While the drives are selected, if the ON or OFF key is clicked for any option, it will be applied to all selected drives. When you have completed your changes, you may select the Save Changes, Reboot Now option, or the Save Changes, Do Not Reboot option. Your changes will not go into effect until the system has been rebooted.
 Drive
Options:
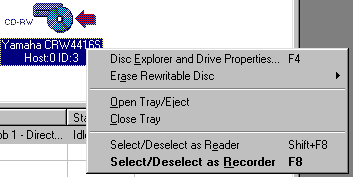
From drives window when you press right click you can choose from various
options..
If you select "Disc Explorer and Drive Properties" you can see detailed Drive properties,CD Media Properties and CD contents.
The Disc Explorer provides detailed information about a disc inserted into a selected drive. It can be used with either a CD-ROM, a DVD-ROM or a recorder.At the completion of the analysis the Disc Explorer panel will present the following disc and drive information:
- Drive Properties
- Session/Track list
- Visual diagram of the disc:
> Yellow - If the outer ring of the diagram is yellow the disc is appendable
(open)
> Green - The inner ring of the diagram shows the portion of the disc that
is recorded on an appendable disc
> White - If the outer ring of the diagram is white the disc is not appendable
(closed)
> Grey - The inner ring of the diagram shows the portion of the disc that
is recorded on a non-appendable disc
> Blue - The disc is a rewritable format. Use only as a copy source
> Red - The disc is DVD format. Use only as a copy source
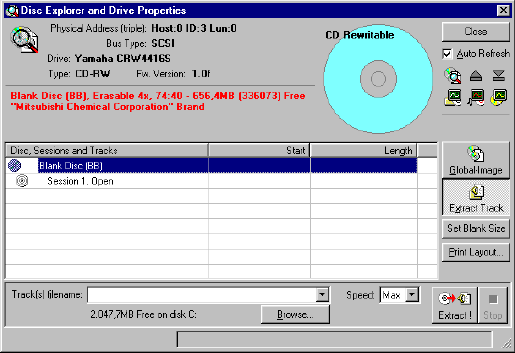
From there you can extract image of CD or specific tracks of CD. Press Global Image button, select name of image and extraction speed and press "Build". PrimoCD give details about extraction speed (instand and overall) and progress bar. Extraction file is at *.gi format (only read by PrimoCD).
Same way work Track extraction. You select the desired track of CD and after choosing file name you press "Extract". Here extractioned file has either ISO or wav file extension. Bad thing here is that on IDE devices (aka Teac 532E-A) you couldn't select extraction speed (only max was avaible). This could cause problems since Teac can't do perfect DAE above 6x...
You can also do various tests to see how your drive performs on Data and DAE extraction. PrimoCD results : Teac (15.2x Data & 16.4x DAE 98% correct), Plextor (19.0x Data & 18.3X DAE 100% correct) and Yamaha 4416s (9.3x Data & 7.4x DAE speed..NO % of how much it is correct). From this menu default blank size can be inserted and print the layout of CD.
Program Options:
From Tools>>Options you can select:
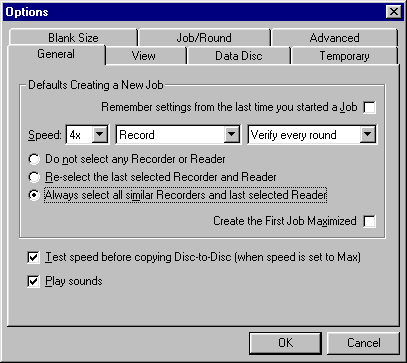 General:
The General Tab gives you the standard options for the application and it's default settings.
You can modify default speed of the recording, default type of recording.
If you select one of the radio buttons which will automatically select a recorder or multiple recorders which will be selected by default for your recording job. The General Tab also provides you with the ability to set the length of the Log Panel's Log. You may select to save 500 entries, 1000 entries, 5000 entries, or 10000 entries. The option to use a small font for the log panel is also found here.
View:
The first option on the View Tab is the Refresh While Adjusting The Windows
Split tab. When this is checked, the screen status will be updated when you
modify the column and row borders. You may also select to use Flat Toolbars
from this screen. The next option is for Guidelines in the List Views. When
this is checked, and screen which is divided into columns and rows will have
guidelines displayed. The View Tab also allows you to configure the picture
which is displayed by default on your desktop. You may also select to not display
a graphic, or to display another graphic (.bmp, jpg, and .gif images.).
Data Job:
The Data Job Tab allows you to set the default Path for your data files
when added to a Data Job. The default setting is set to Ask. Whenever you add
a file to a data job, the program will prompt you to select the destination
folder on the CD for the selected files. You may change this option to automatically
remove the directories from which the file or directory is nested under (No
Path), or you may select it to automatically use the full directory path for
the file (Full Path).
Temporary:
The Temporary Tab allows you to select the directory which the application
will use when creating temporary files or temporary images.
Advanced:
The Advanced Tab allows you to select the type of error reporting (command,
sense, ASC, and ASCQ codes) of the failure when your recording fails. The Advanced
Tab also allows you to select the mix for the CD-R drives. The nice here is
that you can mix different models of CDR-W drives!..However PrimoCD suggests
to use only default option (same model and same firmware).
Job/Round:
The Job/Round Tab allows you to set the various options for use when doing
multiple job or round recorders. The first option available is to "Compute
the discs still to go, count only the good ones". When this option is checked,
it will only count the discs recorded successfully as being completed.
The Job Start box allows you to select the default setting for when a recording begins. You may have the recorders automatically check to see if the blank discs are inserted (default), or you may have the recorders eject their trays for loading. The End of Recording option gives you different options. You may also select how the recorders will treat the discs once they have been completed. You may select to have the drives Eject All Discs whether the recording completed successfully or not (default), have the drives Eject Only Good Discs, or to not eject the discs when the recording completes.
Blank Size:
The Blank Size Tab allows you to input the default size of your blank recordable
media. As you might understand from this menu you can select the overburning
feature by inserting not the actual size (ex. 74min) but the max size of CD
(ex. 76min). CD size is inserted into sectors and also you can see size &
time of inserted sectors.
Review Pages


