Battle of the CPU Coolers
18. Zalman CNPS8700NT
Review Pages
2. Akasa AK-965
3. Akasa AK-925 Revo
4. Asus Silent Knight II
5. Asus Triton 75
6. GlacialTech Igloo 5160
7. Noctua NH-U12F
8. OCZ Vendetta
9. Scythe Andy Samurai Master
10. Scythe Kama Cross
11. Scythe Infinity (Mugen)
12. Scythe Ninja Mini
13. SunbeamTech.com Silent Whisper
14. Titan Amanda Tec
15. Titan TTC-NK34TZ
16. Titan Vanessa L-Type
17. Tuniq Tower 120
18. Zalman CNPS8700NT
19. Zalman CNPS9700LED
20. Zaward VIVO
21. Test methodology
22. Results - Idle
23. Results - Load
24. Results - Noise
25. Summary
| Manufacturer | Zalman |
| Model | |
| Price Range | $66.50 |
| Category | HTCP/Medium Level |
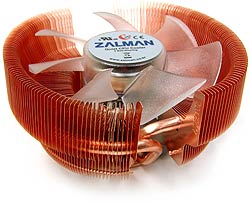
Zalman has a long tradition at manufacturing high quality CPU coolers. The design and term "Flower Cooler" has been used by Zalman since 2001 The CNPS8700 has several improvements compared to the CNPS7000 series, mostly in its cooling ability through the use of two heatpipes at the base. As Zalman describes "...Rather than the radial fins being attached directly to the base of the heatsink, the two heatpipes are now attached there instead. They cross over each other and then pass around the circumference of the whole cooler. Before they rejoin the base, the heat generated by the CPU is passed into 87 ultra-thin 0.2mm copper fins...".

Zalman offers two variations of the same product, the CNPS8700 LED and CNPS8700 NT. Both are identical in physical structure and design, while their main differences are the fan connector and the color of the heatsinks.
CNPS8700LED
The LED version has a standard copper finish and is supplied with a 3-pin fan and a controller to allow the user to control the fan speed manually.

CNPS8700 NT
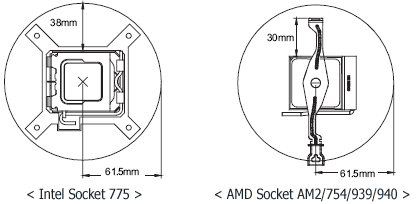
The NT version has a nickel-plated silver finish and is supplied with a 4-pin PWM fan. The fan speed is automatically controlled by the motherboard BIOS. Today we will review this model. The CNPS8700 is compatible with all the major socket types. Due to the size/volume/design of the cooler there must be no motherboard components standing taller than 39mm within a 61.5mm radius as shown in the pictures bellow.
- Features
- Compatible with all single, dual, and quad core CPUs for Intel socket 775 and AMD socket
AM2/754/939/940. - Compatible with Slim Tower / Low Profile Home Theater PC Enclosures.
- Automatic Fan Speed Control feature included in the Ultra Quiet 110mm PWM(Pulse Width Modulation) enabled fan.
- Patented curved heatpipe design for heat transfer performance of up to 4 heatpipes using just 2.
- Ultra-thin 0.2mm fins for minimized weight and significantly reduced airflow resistance.
- Full Specifications
| Model | CNPS8700-LED |
CNPS8700-NT |
|---|---|---|
| Dimensions | 120(L) X 123(W) X 67(H) mm |
|
| Weight | 475g |
|
| Base Material | Pure Copper |
|
| Dissipation Area | 3,300cm2 |
|
| Bearing Type | 2 Ball-Bearing |
|
| Speed | 1150rpm � 10% ~ 2300rpm � 10% |
1150rpm � 10% ~ 2100rpm � 10% |
| Noise Level | 17.5dBA � 10% ~ 33dBA � 10% |
17.5dBA � 10% ~ 30dBA � 10% |
| Fan Control Method | Manual with FANMATE2 |
PWM Control, Auto Restart |
- Retail package
The retail package of Zalman CNPS8700NT is "slim" compared to other packages. The big transparent window allows you to check how the cooler looks like before buy:

After opening the package, we can finally see the contents:
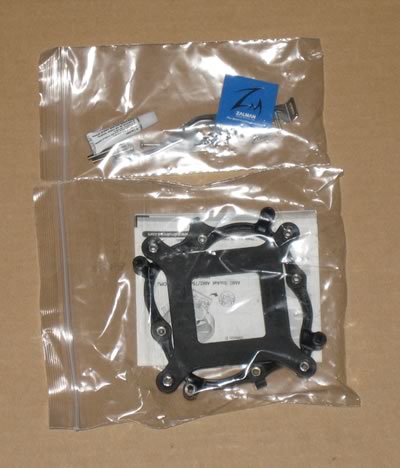

Here is whats included:
- Cooler (CNPS8700 NT)
- Thermal Grease
- Clip
- Clip Lever
- User’s Manual
- Four (4) Clip Support Fixing Bolts
- One (1) Clip Support for Socket 775
- One (1) Backplate for Socket 775
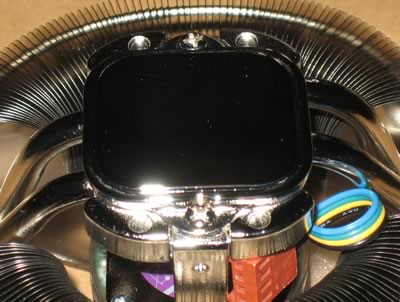
The cooler is very compact. The low height is an ideal solution for HTPC users who wish to upgrade their cooling systems. The finish is very good, Zalman has a good reputation in manufacturing quality products. The aluminium fins bent very easily so be careful when installing the cooler. .
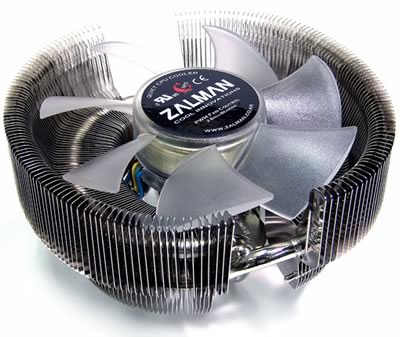
At the base there are the two heatpipes we talked about during our introduction. The base has mirror finish and it's very well constructed.

- Installation
Zalman offers an installation video at the product's homepage and you should view it before buy. The whole installation procedure is rather easy to understand. First you have to install the backplate and the mounting bracket. So far so good. There is a case that the mounting bracket is not compatible with your motherboard, so you should rotate by 90 degrees, this isalso mentioned in the printed manual. The next step, and probably the most time consuming is to slide the mounting clip in the cooler, center it on the ridge on top of the cooler, and slide a little handle at the end of the clip. The main problem in our case was the motherboard's heatsinks, so we had to use a small screwdriver to secure it.

After that you press the front level down to get a perfect fit. This installation procedure is the same for both AMD and Intel processors.

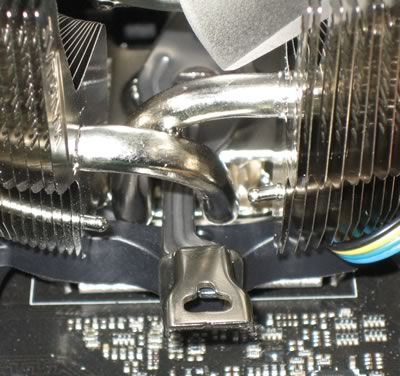
Lets now examine how our new cooler looks like. Probably you will notice that this cooler is low heighted. That's the good news. The bad news is that it will probably interfere with the motherboard's copper heatpipes, as in our case. So you would probably need to put some extra force to get a perfect fit during the installation procedure. I can understand that by that the motherboard's copper heatpipes could also benefit from the cooling air, so maybe its a good thing after all.


Finally, its time to see how the cooler looks inside the case. Very low height...

And enough empty space around the CPU area.

During its operation, this cooler will glow in an electric blue color, good if you are a modder.

- Ratings
| Retail package | |
| Design | |
| Motherboard compatibility | |
| Installation time | |
| Copper Base quality |