Breaking News

Xiaomi Unveils Xiaomi 17 Ultra Firewalla App 1.67 Brings Enterprise Wi-Fi, RADIUS, and Advanced AP7 Controls to Small Businesses and Power Users Samsung To Unveil AI Vision Built With Google Gemini at CES 2026 Samsung Unveils New Odyssey Gaming Monitor Lineup COLORFUL Launches iGame GeForce RTX 50 MINI OC Series Graphics Cards for Compact PCs

logo

  • Share Us
    • Facebook
    • Twitter
  • Home
  • Home
  • News
  • Reviews
  • Essays
  • Forum
  • Legacy
  • About
    • Submit News

    • Contact Us
    • Privacy

    • Promotion
    • Advertise

    • RSS Feed
    • Site Map

Search form

Noctua NH-L9X65 - NH-D9L

Nov 27,2023 0

3. Installation


Review Pages

1. Introduction
2. Retail Package
3. Installation
4. Performance
5. Conclusion


Installing the CPU cooler requires several steps. The retail box includes all the needed information to install the CPU cooler either with Intel or AMD platform. Depending on the used system (AMD or Intel), you have to follow the printed/online instructions about the installation process.

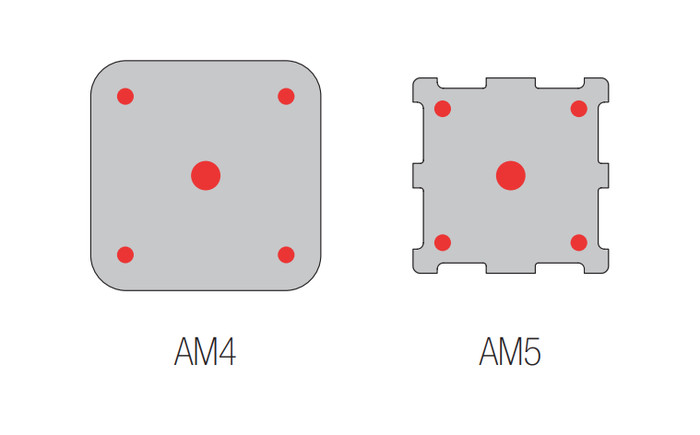
For the AMD AM5 platform, you have to

a) Removing the stock retention module

b) put the plastic spacers onto the screw threads of the backplate. Then fix the NM-AMB12 mounting bars using the four NM-ALS1 long screws.

c) On AM5 and Ryzen 5000/3000 series AM4 CPUs, choose the -7mm offset hole position to ensure optimal contact quality and performance. On other AM4 CPUs, or if there are any compatibility issues in the offset position (e.g. clearance with motherboard heatsinks), please choose the standard position (0).

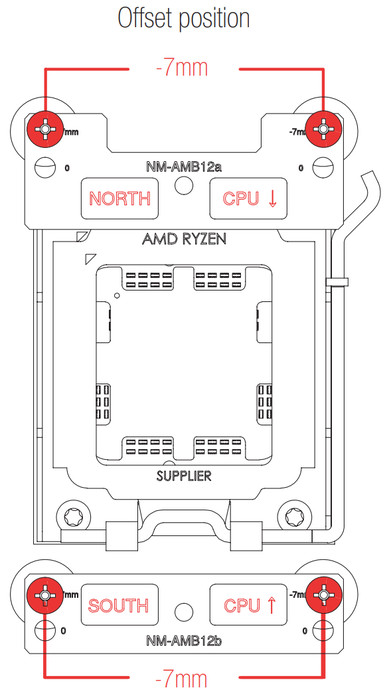
Make sure that the “CPU →” markings point towards the CPU and that the NM-AMB12a bar with the “NORTH” marking is installed on the north (top) side of the socket and the NM-AMB12b bar with the “SOUTH” marking is installed on the south (bottom) side of the socket, as shown above

d) Gently tighten the screws until they stop, but do not use excessive force (max. torque 0.6 Nm).

e) Applying the thermal paste. If there are residual traces of thermal paste or thermal pads on your CPU, please clean them off first. Then, apply 5 dots of the supplied NT-H1 thermal paste; 4 small dots with ~2mm diameter near the corners plus 1 dot with 3-4mm diameter in the center.

f) Fastening the heatsink to the CPU. first, take off the fan as well as the protection cover at the bottom side of the heatsink. Then put the heatsink onto the CPU and screw it to the screw threads of the mounting bars. Perform 2-3 turns on each screw, then repeat until both are fully tightened. Gently tighten the screws until they stop, but do not use excessive force (max. torque 0.6 Nm). Reattach the fan using the supplied steel clips.

Connect the fan(s) to the motherboard’s CPU fan header(s). If necessary, use the supplied NA-YC1 y-cable to connect both fans to one fan header. Even with the 92mm fan installed, there is some clearance at the front, while you can also install a second at the back area without any issues as well.


Installation of the Noctua NH-D9L


Installation of the Noctua NH-L9x65


Review Pages

1. Introduction
2. Retail Package
3. Installation
4. Performance
5. Conclusion


Pages

  • « first
  • ‹ previous
  • 1
  • 2
  • 3
  • 4
  • 5
  • next ›
  • last »

Noctua

Tags: Noctua
Previous Post
Crucial T500 2TB NVME
Next Post
Kioxia Exceria High Endurance MicroSD 512GB

Related Posts

  • Noctua NP-DM3 desk mat

  • Noctua presents chromax.black versions of its NH-D15 G2 and NF-A14x25 G2

  • Noctua celebrates 20-year anniversary with new website and desk mat

  • Noctua NF-A12x25 G2 fans

  • ASUS and Noctua announce ASUS GeForce RTX 5080 Noctua Edition graphics card

  • Noctua introduces NF-A12x25 G2 next-generation 120mm fan

  • Noctua at Computex 2025

  • Noctua releases NH-D15 G2 specific offset LGA1851 mounting bars for improved cooling performance

Latest Reviews

EnGenius ECW520 AP
Enterprise & IT

EnGenius ECW520 AP

Noctua NP-DM3 desk mat
Gaming

Noctua NP-DM3 desk mat

Crucial P510 2TB NMVE
PC components

Crucial P510 2TB NMVE

The Quiet Technology Behind the Spin
Enterprise & IT

The Quiet Technology Behind the Spin

Crucial DDR5 Pro 6400 CL32
PC components

Crucial DDR5 Pro 6400 CL32

Popular News

COLORFUL Introduces CVN B850I GAMING FROZEN Motherboard

COLORFUL Introduces CVN B850I GAMING FROZEN Motherboard

COLORFUL Presents CVN X870 ARK FROZEN Motherboard for AMD Ryzen 9000 CPUs

COLORFUL Presents CVN X870 ARK FROZEN Motherboard for AMD Ryzen 9000 CPUs

COLORFUL Presents the B860 Series Motherboards

COLORFUL Presents the B860 Series Motherboards

Intel-AMD new motherboards announced

Intel-AMD new motherboards announced

TEAMGROUP Launches EXPERT P34F Find My External SSD

TEAMGROUP Launches EXPERT P34F Find My External SSD

ASRock AM5 Motherboards Now Fully Support AMD Ryzen 9 9950X3D & 9900X3D Processors

ASRock AM5 Motherboards Now Fully Support AMD Ryzen 9 9950X3D & 9900X3D Processors

Samsung announces Galaxy Tab S11 and Galaxy S25 FE series

Samsung announces Galaxy Tab S11 and Galaxy S25 FE series

Viltrox Showcases Upcoming Lens Lineup and New TTL Flash at IBC 2025

Viltrox Showcases Upcoming Lens Lineup and New TTL Flash at IBC 2025

Main menu

  • Home
  • News
  • Reviews
  • Essays
  • Forum
  • Legacy
  • About
    • Submit News

    • Contact Us
    • Privacy

    • Promotion
    • Advertise

    • RSS Feed
    • Site Map
  • About
  • Privacy
  • Contact Us
  • Promotional Opportunities @ CdrInfo.com
  • Advertise on out site
  • Submit your News to our site
  • RSS Feed