PatriotMemory Box Office Player
3. Powering up the player
Review Pages
After connecting the power and the corresponding cables with our TV panel (either HDMI or composite) it's time to power up the player. The on/off switch placed on the the back side gets our player up and running. The noise coming out of the box is due to the fan running inside to box. Some of you may find it frustrating but we will say more on this later on.
A better and more ergonomic design for the remote control could be a good idea. While the center four arrow buttons make navigation easy to work with, it will take you some time to get familiar with the the play/stop, FF/FW and volume up/down buttons due to their small size and their awkward position on the remote control. Maybe it's a matter of personal taste, but anyway there is space for some improvements here for sure. The player's reception to the signal of the remote control could be also better. To get an immediate response, you will need to point the remote control directly to the main unit.
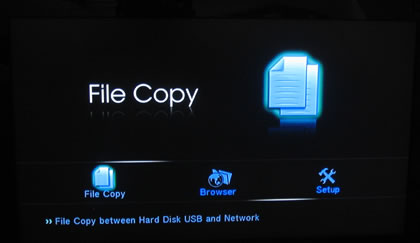
Once the player is ON, the Patriot Box Office logo appears on the screen. After ~10secs, the first menu page is comes up. In the first time boot up you will be prompted to select the menu language, data/time and the TV system (PAL, NTSC). Shortly after that the main menu will come alive, offering access to three main functions: "File Copy," "Browser" and "Setup."
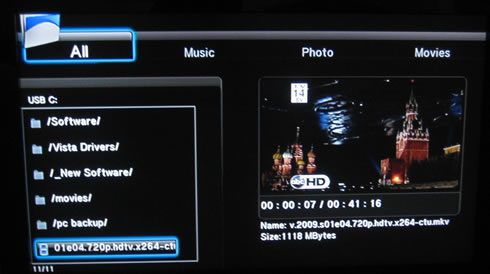
Let's plug a USB key or USB HDD on the device and try to play back some files. The Box Office player will seek for compatible files and will show you a preview of them on the the right area. Pressing the "Enter" button will put the selected file (i.e. movie) into a full screen mode for you to enjoy it.
Pressing the "Browser" button on the remote control will get you back to the folder selection menu where you can navigate among your files. The player can seek for compatible files in devices plugged into the USB ports, HDD, local network (wired or wireless), UPNP devices and the Playlist, which is actually direct shortcuts to your favorite clips:

The menus are quite simple although we would like them to be somewhat more responsive. To speed things up you may disable the "preview" option in the "Options" menu. Going up/down using the centered four way pad on the right will show you information about each media file such as its size:
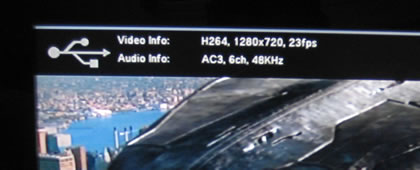
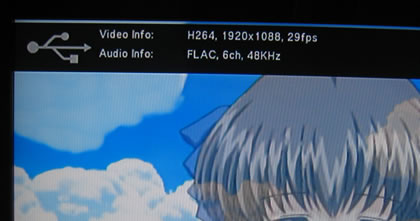
During the full screen reproduction of a video you may also get some on screen information about it ( video/audio properties.)

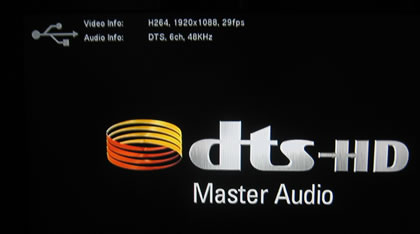
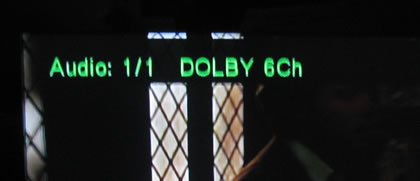
Using the corresponding button, you can select the available audio modes/channels (Dolby, DTS, etc) or different languages:
During movie playback you can fast forward/backward gradually from 1.5x, 2x, 4x, 8x, 16x and 32x. However, you cannot jump to a specific part of the movie at once - i.e jump from the beginning to the end of an .avi movie file- something you can do with a software player for a PC. This is probably a limitation for all the currently available media players.

You can also zoom on the videos by pressing the "enter" button (0.9x, 1x, 2x, 4x and 8x zoom).

Zooming to get the black borders removed is not a good idea since you will loose a part of the video's frame:


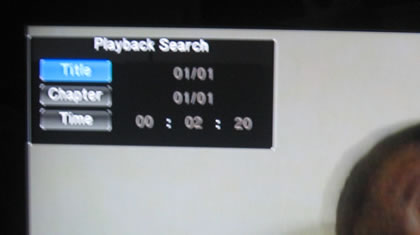
The "goto" button allows you to skip to a specific title, a useful function for DVD ISO files mostly.
The "File copy" function is very easy to understand. The Box Office is able to copy files stored on your USB, HDD and Network devices (source files) and paste them to the desired destination/medium. The "Source" files can also be easily deleted:

- Installing a 2.5" HDD disk
You can easily install a 2.5" HDD to your Box office player. Just remove the two screws found on the back side remove the case of the player. You can fasten the HDD using two screws in both sides. Format the HDD and in a few minutes, you are ready to use it. Installing a HDD allows you to "unlock" several features such as the Bitorrent client as well as shortcuts.
If you have no plans for an HDD inside, you may want to unplug the yellow and black wire from the board. This is the power connector for the internal fan. The specific cooling fan is available there in order to increase the air flow inside the player when a HDD is present.