Breaking News

ASUS Announces T1 GeForce RTX 5070 and RTX 5060 Ti Graphics Cards COLORFUL Launches iGame B850M ULTRA Series Micro-ATX Motherboards Sony Unveils 1000X THE COLLEXION Samsung Launches Next-Gen Odyssey, ViewFinity and The Movingstyle Essential Monitors LG Electronics Introduces World’s First Native 1000Hz Full HD Gaming Monitor

logo

  • Share Us
    • Facebook
    • Twitter
  • Home
  • Home
  • News
  • Reviews
  • Essays
  • Forum
  • Legacy
  • About
    • Submit News

    • Contact Us
    • Privacy

    • Promotion
    • Advertise

    • RSS Feed
    • Site Map

Search form

Vantec Mach1

Jul 22,2005 0

2. Installation


Review Pages

1. Introduction
2. Installation
3. Performance
4. Conclusion


As mentioned on the previous page, the installation was extremely easy without the need to use any tools whatsoever. Before moving on to the installation procedure, lets have a look at our test PC and its specs as reported by the well known utility CPUZ.

as is reported by the CPU-Z utility...

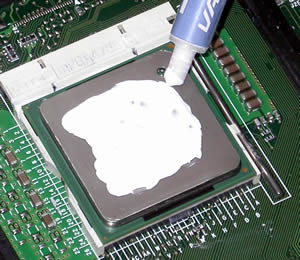
Removing the old CPU cooler and cleaning the CPU of any residual thermal compound, was the only time consuming step when installing the Vantec CPU fansink. Other than this, there's no need to remove anything else (base, retention clips, etc) as the cooler is compatible with the already in place fastening hardware.

all previous thermal compound must be cleaned prior to applying any new compound..

Once clean, apply a new, thin layer of thermal compound onto the CPU. The use of Vantec's thermal paste, included in the retail box is recommended, as all reported results and tests from the manufacturer were carried out with the stock paste.

The Vantec stock thermal paste, retail box included.

The paste must be spread on evenly so as to avoid trapping any air bubbles when the cooler is clamped onto the CPU. To help, when you first place the cooler on the CPU, turn the cooler slightly, clockwise and anticlockwise a few times to spread the compound.

we don't need to spread it 100%

prior to placing the brackets...

Now fasten the brackets.

The brackets hook straight onto the retention module.

After fastening the brackets on each side of the cooler, we attached the power cable to the power socket on the motherboard. Now the CPU fansink is up and ready to work.

up and working...

If you want, you can also attach the included dimmer for controlling the fan's rotation speed.

The dimmer in place. Views from inside the case and outside.

Now that we have covered the installation process, it's time to move on to the performance tests and see how the mach1 does under heavy stress in high and low mode.


Review Pages

1. Introduction
2. Installation
3. Performance
4. Conclusion


Pages

  • « first
  • ‹ previous
  • 1
  • 2
  • 3
  • 4
  • next ›
  • last »

Vantec

Tags: Vantec
Previous Post
Thermaltake PurePower 500W
Next Post
Apacer VS Transcend (DDR2 533MHz)

Related Posts

  • Vantec iCEBERQ6

  • Vantec NST-530U2 External Enclosure

  • Vantec PSU

  • New NexStar DX for DVD Burners

  • Vantec NexStar 3 eSATA

  • Vantec AVOX Jukebox Review

  • Vantec AVOX Jukebox

  • Vantec NexStar 3

Latest Reviews

The Technology Stack Behind Modern Digital Gaming Platforms
Consumer Electronics

The Technology Stack Behind Modern Digital Gaming Platforms

be quiet! Dark Rock Pro 6
Cooling Systems

be quiet! Dark Rock Pro 6

How Online Casinos Use Encryption, Verification, and Risk Controls to Build User Trust
Enterprise & IT

How Online Casinos Use Encryption, Verification, and Risk Controls to Build User Trust

Why Low-Latency Infrastructure Matters More Than Raw Specs
Enterprise & IT

Why Low-Latency Infrastructure Matters More Than Raw Specs

In the Age of AI Phishing, the Best User Experience Might Be the One That Feels Safest
Enterprise & IT

In the Age of AI Phishing, the Best User Experience Might Be the One That Feels Safest

Popular News

TEAMGROUP Launches EXPERT P34F Find My External SSD

TEAMGROUP Launches EXPERT P34F Find My External SSD

CORSAIR announces Vanguard Pro 96 and Vanguard 96 Gaming Keyboards

CORSAIR announces Vanguard Pro 96 and Vanguard 96 Gaming Keyboards

Samsung announces Galaxy Tab S11 and Galaxy S25 FE series

Samsung announces Galaxy Tab S11 and Galaxy S25 FE series

Viltrox Showcases Upcoming Lens Lineup and New TTL Flash at IBC 2025

Viltrox Showcases Upcoming Lens Lineup and New TTL Flash at IBC 2025

MSI Launches FORGE GK600 TKL WIRELESS Special Edition Compact Mechanical Keyboard

MSI Launches FORGE GK600 TKL WIRELESS Special Edition Compact Mechanical Keyboard

Panasonic Introduces the First Ultra-Telephoto Zoom Lens in the LUMIX S Series

Panasonic Introduces the First Ultra-Telephoto Zoom Lens in the LUMIX S Series

MSI Launches DATAMAG 40Gbps Magnetic Portable SSD

MSI Launches DATAMAG 40Gbps Magnetic Portable SSD

Viltrox Joins the L-Mount Alliance, Expanding Creative Possibilities

Viltrox Joins the L-Mount Alliance, Expanding Creative Possibilities

Main menu

  • Home
  • News
  • Reviews
  • Essays
  • Forum
  • Legacy
  • About
    • Submit News

    • Contact Us
    • Privacy

    • Promotion
    • Advertise

    • RSS Feed
    • Site Map
  • About
  • Privacy
  • Contact Us
  • Promotional Opportunities @ CdrInfo.com
  • Advertise on out site
  • Submit your News to our site
  • RSS Feed