Seiko CDP4000 CD Printer
4. Printing Performance
Review Pages
Seiko Precision CDP-4000 CD-R Printer - Page 4
- Loading a CD-R
 When
printing on a CD-R, always fit the CD-R attachment to protect the data recorded
on the disk. To do it, firstly you have to switch off the printer. Move the
adjust lever to the “
When
printing on a CD-R, always fit the CD-R attachment to protect the data recorded
on the disk. To do it, firstly you have to switch off the printer. Move the
adjust lever to the “![]() ”
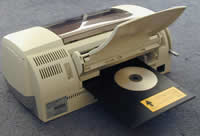
position, as shown next. Then you have to open the printer cover and insert
the caddy straight in with the silver label first and with the surface for
loading the CD-R facing upwards.
”
position, as shown next. Then you have to open the printer cover and insert
the caddy straight in with the silver label first and with the surface for
loading the CD-R facing upwards.
 The
next step is to place the protective cover over the carriage spindle (metal
bar). This is to prevent oil on the carriage spindle getting onto your hands.
The CD-R attachment should be slide out to align the two arrow marks on the
printer. Now the protective cover can be removed.
The
next step is to place the protective cover over the carriage spindle (metal
bar). This is to prevent oil on the carriage spindle getting onto your hands.
The CD-R attachment should be slide out to align the two arrow marks on the
printer. Now the protective cover can be removed.
Move the adjust lever to the “++” position and hold down the maintenance button on the front of the printer so the caddy will automatically adjusted to the correct position. Close the front cover and you are ready for your first print.
- Printing Software
 The
software we had in our hands is the “Seiko Precision Designer v1.0”.
We installed the program and tried to make our first prints. Unfortunately,
the printed label had not a good quality and the settings we tried to apply
did not give the expected results. We decided to use the Corel 10 as the main
labeling software instead, and finally had the accepted print result.
The
software we had in our hands is the “Seiko Precision Designer v1.0”.
We installed the program and tried to make our first prints. Unfortunately,
the printed label had not a good quality and the settings we tried to apply
did not give the expected results. We decided to use the Corel 10 as the main
labeling software instead, and finally had the accepted print result.
Review Pages