Gigabyte GA-EP45-DS3R
4. BIOS
Review Pages
2. Gigabyte GA-EP45-DS3R
3. The Package
4. BIOS
5. Dynamic Energy Saver, Easy Tune 6
6. Benchmarks - Everest Ultimate Edition, SiSoftware Sandra
7. Benchmarks - PCMark Vantage, SYSmark 2007 Preview
8. Benchmarks - Maxon Cinebench, x264 HD Benchmark, TMPGEnc 4 Xpress
9. Benchmarks - SuperPI, wPrime
10. Benchmarks - 3DMark06, Crysis v1.2, Unreal Tournament
11. Overclocking
12. Conclusion
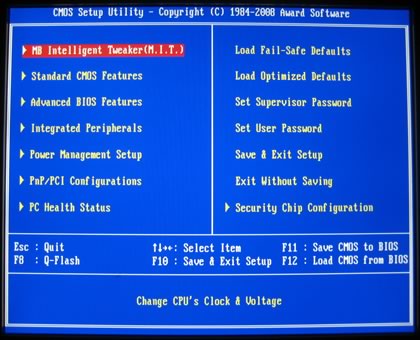
As it happens with all Gigabyte models, the BIOS is based on the Award Software configuration. What's new here is the fact that now the most important features are located under the MB Intellignet Tweaker (M.I.T) tab.
The M.I.T tab includes all those settings required for overclocking the motherboard. We have gathered them all in one picture for better understanding:
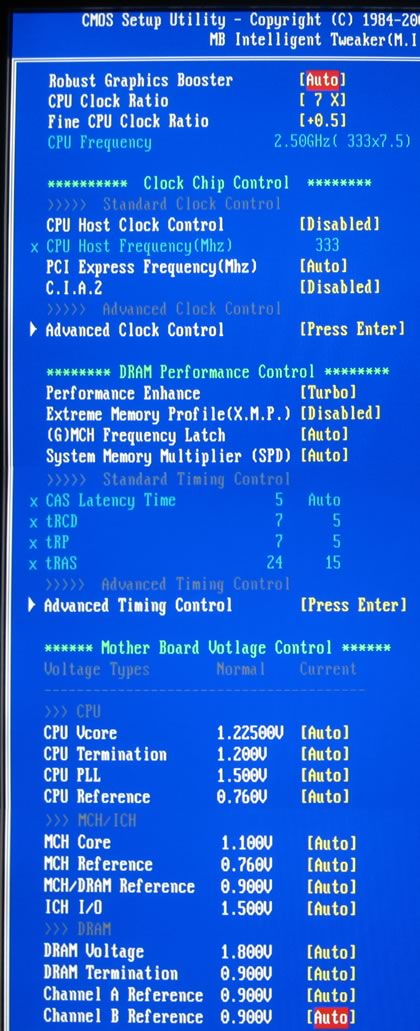
If you already have a Gigabyte motherboard then you should be familiar with the various auto overclocking modes (Gigabyte C.I.A. 2) and performance boosters ("Performance Enhance" & and "Robust Graphics Booster"). The CPU Intelligent Accelerator 2 (C.I.A.2) is designed to automatically adjust CPU computing power to maximize system performance. C.I.A.2 allows your system bus to be changed dynamically based on CPU loading through the use of 5 preset states.
- Disabled Disables the use of C.I.A.2. (Default)
- Cruise Increases CPU frequency by 5% or 7% depending on CPU loading.
- Sports Increases CPU frequency by 7% or 9% depending on CPU loading.
- Racing Increases CPU frequency by 9% or 11% depending on CPU loading.
- Turbo Increases CPU frequency by 15% or 17% depending on CPU loading.
- Full Thrust Increases CPU frequency by 17% or 19% depending on CPU loading.
Gigabyte has changed the way users control voltages and now, you can select the desired voltage directly from the BIOS. Below you can see the selectable voltages for all the major components of the board:
- CPU Core: 0.50000~1.60000V (with 0.00625V step) and 1.6000~2.30000V with 0.02V step
- CPU Termination: 1.000~1.700V (with 0.02V step)
- CPU PLL: 1.050~2.810V (with 0.02V step)
- CPU Reference: 0.460~1.010V (with 0.015 V step)
- MCH Core: 0.850~1.800V (with 0.02V step)
- MCH Reference: 0.500~1.040V (with 0.04V step)
- MCH/DRAM Rerefence: 0.530~1.810V (with 0.05V step)
- ICH I/O: 1.050~2.310V (with 0.02V step)
- DRAM Voltage: 1.450~3.040V (with 0.02V step)
- DRAM Termination: 0.710~1.405V (with 0.025V step)
- Channel A/B Reference: 0.530~1.810V (with 0.05V step)
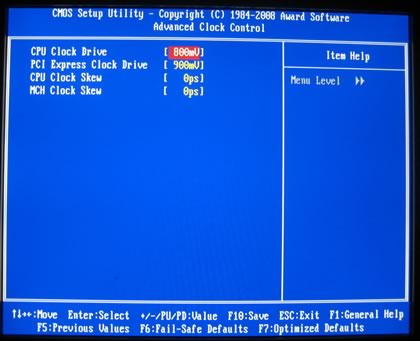
Additional options are available under the advanced clock control tab:
The motherboard supports XMP profiles for DDR2/3 memory. When enabled, the feature allows the BIOS to read the SPD data on XMP memory module(s) to enhance memory performance. A very useful feature in order to get the best performance out from your memory.
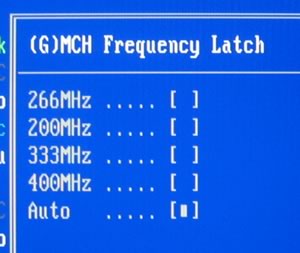
The (G)MCH Frequency Latch allows you to fix the chipset frequency at system bootup. Options for adjusting memory multiplier below may differ according to the fixed frequency. In our case the available options are: Auto (default), 200MHz, 266MHz, 333MHz, 400MHz.
The System Memory Multiplier (SPD) allows you to set the system's memory multiplier. The options dependent on the CPU FSB and the (G)MCH Frequency Latch settings. 'Auto' sets the memory multiplier according to the memory SPD data. (Default: Auto)

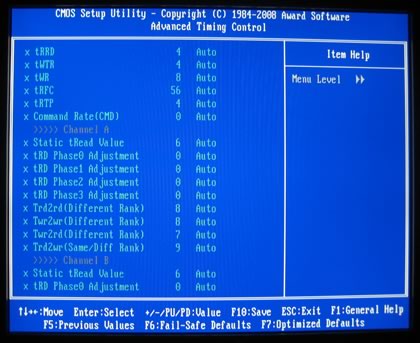
Under the advanced timing control user can set even more options for memory modules:
Finally, another interesting tab is the PC Health Status that offers information about the produced heat of our system.

- Test Configuration
Let's see now how our CPU was identified under CPU-Z:

We performed all tests with Intel Q9300 processor, paired with 2x1GB of Crucial PC2-8000 @ CL5-5-5-15-2T memory modules.


Review Pages
2. Gigabyte GA-EP45-DS3R
3. The Package
4. BIOS
5. Dynamic Energy Saver, Easy Tune 6
6. Benchmarks - Everest Ultimate Edition, SiSoftware Sandra
7. Benchmarks - PCMark Vantage, SYSmark 2007 Preview
8. Benchmarks - Maxon Cinebench, x264 HD Benchmark, TMPGEnc 4 Xpress
9. Benchmarks - SuperPI, wPrime
10. Benchmarks - 3DMark06, Crysis v1.2, Unreal Tournament
11. Overclocking
12. Conclusion


