Thermaltake Golden Orb II
2. Installation
As mentioned before, the installation of the Golden Orb II is not difficult. Unfortunately however, it's also not a fast, at least not for the AMD processors, since the motherboard has to come out from the case and the Thermaltake back plate needs to be installed from scratch. The default AMD backplate will not do, since the Golden Orb uses special mounting screws.
Lets have a brief look at the CPU and motherboard we used for our tests...
 |
| The well known, and quite tested AMD 3500+ |
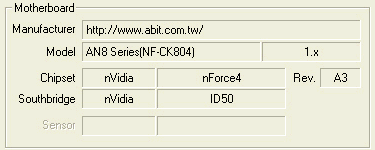 |
| and the Abit Fatality AN8 motherboard |
Now lets move to the motherboard and the cooler components from scratch... We took the motherboard out of the PC case in order to remove the default back plate and install Thermaltake's. Note that you need to peel off the protective strip from the adhesive pad on the plate, before installing onto the motherboard.
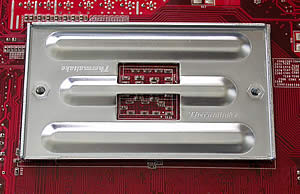 |
| and this is how it should look after mounting the plate.. |
| the back plate carries the manufacturers brand name on it... |
We cleaned the CPU of any previous thermal compound that was still on it, making sure we didn't leave any traces whatsoever.
 |
| notice the mounting points that protrude from the thermaltake backplate.. |
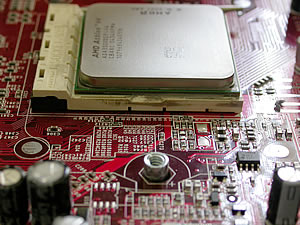
Next step is to screw in the two standoffs on which will be mounted the Thermaltake cooler. This is needed for AMD based processors....
 |
| the standoffs needed for the AMD processors... |
..while with Intel, we use the brackets provided with the cooler.
 |
| mounting the cooler on the thermaltake brackets... |
For Intel motherboards, no backplate is needed at all...
 |
| the screws needed for the AMD processors... |
Nearly done. Place the Cooler on the CPU after first having applied the thermal compound provided by Thermaltake which comes in the package. Move the cooler in a circular motion so that the thermal paste spreads evenly and once the cooler is secured in place, no air bubbles will have been trapped in thin layer of paste between the copper base and the CPU. Then screw the cooler to the standoffs as shown in the pictures below indicates..
 |
| the first installation could prove a little bit harder, more pressure must be applied... |
 |
| A closer look at the procedure... |
Not much left to do now but plug in the 3 pin power connector to the motherboard and the cooler is all set and ready to work...
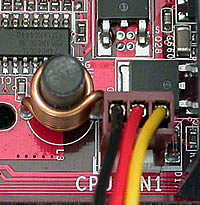 |
| the 3 pin connector... |
And the outcome of this installation...
 |
| The blue glow of the fan is really impressive.. |
As one can see from this page, the installation of a Golden Orb II is easy though it may be more time consuming than with other coolers. Whether it's an Intel or AMD CPU, the motherboard needs to be removed in order to install the cooler. This is one of the minuses of the Thermaltake Cooler, but its performance more than makes up for it, as we will see in the following page.