Primera Bravo Disc Publisher
6. Printer driver-settings
PRIMERA BRAVO OPTICAL PUBLISHING SYSTEM - Page 6
Setting up the printer driver
The printer driver settings affect the print quality of your discs. The default
settings of the Publisher printer driver will fit most printing needs. You can
see access the printing preferences window through either SureThing CD Labeler
or PrimoDVD 2.0 software, or through the Control Panel-àPrinters under
Windows 2000 or Windows XP.
The following picture comes from SureThing CD Labeler after selecting the Printer
Setup option.

Through PrimoDVD2.0, the following window comes up after selecting the Printer Setup Settings..

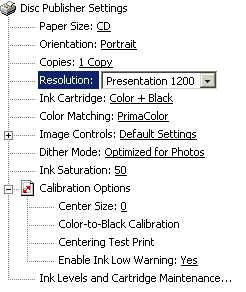
In both cases, the Options/preferences buttons leads to the detailed print preferences window.

The Paper Size options are the Custom and the CD. The Custom option allows
the user to customize the width and the height of the printing area. The CD
option uses the default settings for an accurate print on a CD/DVD media surface.
The print orientation can be set to Portrait or Landscape, among with the number
of copies desired for printing.
 The
printing resolution list box offers four different choices: The Normal and Best
options at 600 dpi resolution, the Presentation at 1200 dpi and the Super quality
at 2400 dpi. The last option provides the highest quality but slowest speed
as well. You may wish to experiment with these options to see which one is the
best for your particular CD media and print quality needs.
According to the desired print result, the user can set the Ink Cartridge setting to Color+Black, Color or Monochrome.
 Click
on the Color Matching down narrow and choose the color matching option that's
right for you. Select None if you are more interested in printing speed rather
than color accuracy, if you have already color corrected your image for printing,
or if you are using some other third party color matching software.
Select Algebraic if you would like the printer driver to make very simple color
balance adjustments based on an RGB color model. This option gives you more
natural looking images without actually utilizing any specific color matching
software.
Select PrimaColor to enable color-matching profiles written specifically for
the Publisher by "Candela Color Management System". This setting automatically
adjusts the color of your image according to predetermined printer profiles
and default system profiles. This results in a very precise color match when
attempting to print photographic images.
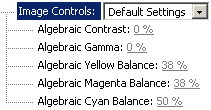
 The
"Image Controls" settings are set to the default values, and the user
cannot change them.
The Dither mode list box has two selections, the "Optimized for Photos"
and the "Optimized for graphics". Select the first if printing a design
primarily composed of photographic images and the second choice if you intend
to mainly print text, lines, and graphics.
In the same tab you can also adjust the ink saturation of the printed image.
When printing onto the printer manufacturer's TuffCoat CD media, this option
can be left at its default setting of 50%. When printing onto other brands of
printable CD media, you may need to adjust this control in order to optimize
the ink saturation for the printable surface of your specific CD media. You
will certainly have to experiment yourself when changing media types.
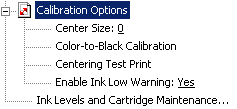
 The
Calibration options tab displays options for fine-tuning the position of the
printed image, changing the size of a CD's non-printable center, and also performing
a bi-directional calibration. The Color-to-Black Calibration properties button
will print a reference disc with calibration numbers in order to use them in
the corresponding window that appears after printing the calibration disc. Note
that the Publisher is factory-calibrated and changing these settings might offer
unwanted results.
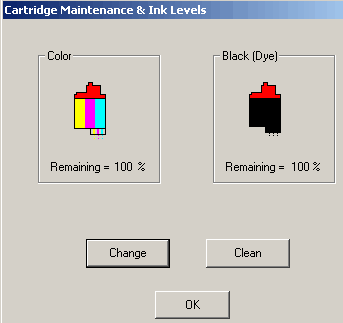
Last, the user can choose to be warned for the ink levels, and change or clean
the cartridges, through the Ink and Cartridge Maintenance feature.


