Primera SignaturePro CD Printer
2. Installation - Page 1
Review Pages
2. Installation - Page 1
3. Installation - Page 2
4. Printing Software
5. Printing Performance
6. Conclusion
Primera Signature Pro CD-R Printer - Page 2
Installation - Page 1
- Identifying the parts
 The
printer looks very solid and weights about 4.3Kgr. Its dimensions are 190mmH
x 432mm W x 266mmD. The illustration shows the CD tray and all of the control
buttons and LED indicator lights found on the printer. On the top of the printer
you will find the power button, the CD tray button witch opens and closes the
CD tray, and the ink cartridge button, which positions the cartridge carrier
for easy ink cartridge replacement.
The
printer looks very solid and weights about 4.3Kgr. Its dimensions are 190mmH
x 432mm W x 266mmD. The illustration shows the CD tray and all of the control
buttons and LED indicator lights found on the printer. On the top of the printer
you will find the power button, the CD tray button witch opens and closes the
CD tray, and the ink cartridge button, which positions the cartridge carrier
for easy ink cartridge replacement.

The power light indicates that power is on. The busy light indicates that the printer is printing, processing, or is in some way busy.
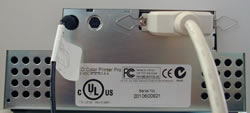 On
the rear panel of the printer there are the communication ports. Both serial
and parallel interface port are provided. If using the printer with Windows,
you will use its parallel interface port. Note that the printer’s auxiliary
port is for use with auto loaders and automatic duplicators only. Also you can
find the manufacturer label.
On
the rear panel of the printer there are the communication ports. Both serial
and parallel interface port are provided. If using the printer with Windows,
you will use its parallel interface port. Note that the printer’s auxiliary
port is for use with auto loaders and automatic duplicators only. Also you can
find the manufacturer label.
- Installing ink cartridges
 For
full-color printing, a 3-color ink cartridge is available. This cartridge contains
the three process-color inks of yellow, magenta and cyan, which combine to produce
up to 16.7 million colors. The available monochrome ink cartridge can be used
for inexpensive printings and of course with the 3-color ink cartridge for 4-color
CMYK printings.
For
full-color printing, a 3-color ink cartridge is available. This cartridge contains
the three process-color inks of yellow, magenta and cyan, which combine to produce
up to 16.7 million colors. The available monochrome ink cartridge can be used
for inexpensive printings and of course with the 3-color ink cartridge for 4-color
CMYK printings.
 Note
that since different brands of CDs have different printable coatings, you may
have to adjust the printer driver settings to accommodate your specific brand
of CD media. You may find that certain brands of CDs provide higher printing
quality than others.
Note
that since different brands of CDs have different printable coatings, you may
have to adjust the printer driver settings to accommodate your specific brand
of CD media. You may find that certain brands of CDs provide higher printing
quality than others.
With the CD tray closed, open the printer’s front cover by pulling down its top-left corner. Remove the tape covering the cartridge’s print head and press the Ink Cartridge button on the printer to move the carrier to the load position. Insert the color ink cartridge into the left cartridge carrier position and the black cartridge in the right position. The copper end is placed first. Close the printer’s front cover and press the ink cartridge button to reset the cartridge carrier. We are ready to install the printer under Windows ME.
Review Pages
2. Installation - Page 1
3. Installation - Page 2
4. Printing Software
5. Printing Performance
6. Conclusion