Connect3D X800
15. Overclocking
No matter your graphics card, there comes a time in your computer's life when it can no longer cope with the latest technology the ever so popular games use. This is one of the main reasons for overclocking your graphics card. Gamers are always looking forward for a little extra boost in terms of framerate. Even though most of the times the boost is far from noticeable, overclocking remains the last resort when you can't afford to buy a brand new VGA card.
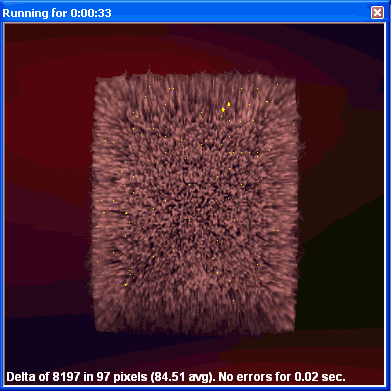 |
Increasing the memory clock too much, produces the so-called "artifacts". |
The stock clock speeds for the core and memory were 390MHz and 350MHz respectively, as you can see in the ATiTool screenshot below. We mentioned before that the memory parts used by the Connect3D X800 are the 2.0ns K4J55323QF-GC20. The 350MHz frequency to which they are initially set is just too low, so overclocking the memory will be very easy.

First thing we do to overclock the card is to step-by-step increase the memory clock until we find the maximum stable setting that does not produce screen artifacts in either ATiTool test or games. Then, being sure of that frequency, we increase the core clock likewise. Our final settings can be seen in the following screenshot.
 |
The factory frequencies for the Sapphire X800. |
That is an extra 50MHz for the core and 200MHz for the memory which is very similar to what the Sapphire X800 could overclock to, only 10MHz lower memory speed increase.
Let's see the performance boost we got from the new clock settings:
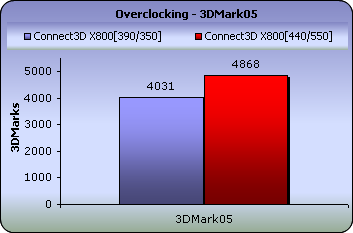
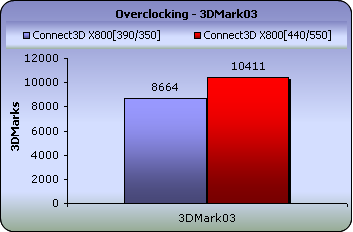
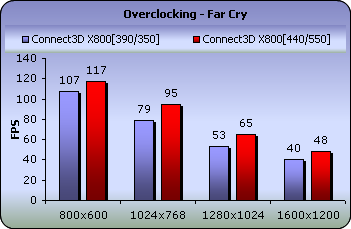
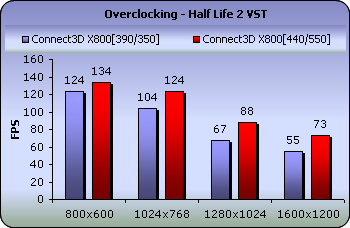
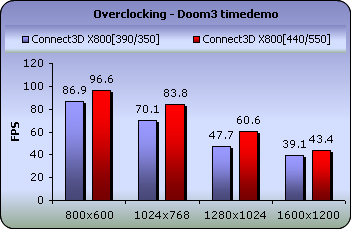
The new framerates for the overclocked Connect3D X800 are exciting. In some cases we even got a 20fps boost and even Doom3, which tends to be much harder to improve the framerate, yielded 13fps under 1024x768.
Even if there's currently no way to unlock the 4 missing pipelines and turn this card into an XT, it's still an excellent overclocker and worth all the risks in messing with the clock settings.