Asus P6T Deluxe Vs Foxconn Renaissance
14. Overclocking tests - Foxconn Renaissance
Review Pages
2. Asus P6T Deluxe/OC Palm Edition - Opening the box
3. Asus P6T Deluxe/OC Palm Edition - BIOS
4. Foxconn Renaissance - Specifications
5. Foxconn Renaissance - Opening the box
6. Foxconn Renaissance - BIOS
7. Testbed
8. Benchmarks - Everest Ultimate Edition, SiSoftware Sandra
9. Benchmarks - PCMark Vantage, BAPCo's SYSmark 2007 Preview
10. Benchmarks - MAXON CINEBENCH, x264 HD Benchmark, TMPGEnc 4 Xpress
11. Benchmarks - SuperPI, wPrime
12. Benchmarks - 3DMark 06, Crysis v1.2
13. Overclocking tests - Asus P6T Deluxe
14. Overclocking tests - Foxconn Renaissance
15. Conclusion
Compared with the Asus mainboard, the Foxconn Renaissance offers less BIOS options to play with, especially at the Voltage area. After disabling the Turbo mode, you have to guess the corresponding cpu voltage, since the system doesn't offer an Auto option.
Your first stop should be the Clock Mode Select area (select manual) that corresponds to the old well-known FSB for the new Core i7 platform. From the default 133Mhz, try to gradually increase it and at the same time rise up the vCore. What's rather annoying is that after every boot, the system won't display the "real" running speed at the post messages. That makes your task more difficult since you cannot be sure if the overclocking values you have selected worked or not.
Let's move on. You can start experimenting for the Core i7-920 starting from the 180MHz CPU Frequency Setting and the +0.07V (1.26V) for the vCore. Increasing the Memory Voltage to 1.65V is also a good idea. That should give you a totally stable 3.60GHz with CL8 (when using DDR3-1066 memory). Rebooting and selecting the CL7 under memory tab should give you higher performance.
Enabling the Turbo function must give you even more performance...or not? After booting into Windows, we saw that the the CPU frequency had been increased at 3.78GHz.
We were ready to test the system's stability. But then we noticed that the CPU frequency returned back to 3.60GHz!
We also enabled the C-State Tech and without any load, we saw the CPU frequency to rise up to 3.90GHz. Again, after pushing the the system, the CPU clock returned back to 3.60GHz:
In short words, the Turbo Function at the Foxconn Renaissance, doesn't seem to help much with overclocking, so you 'd better disable it in order to come up with safer results.
In order to process with the 190MHz and 3.80GHz, we had to set the memory to Auto, the vCore at 1.37v (+0.18V) and the NB Voltage to 1.21V. However, the was normally not very stable, so it seems that 180MHz is the sweet point for the Intel Core i7-920 processor with the Foxconn Renaissance.

We did noticed that the available DRAM Frequency settings under BIOS (800, 1066, 1333, 1600, 1866 and 2133 Mhz) actually don't work at least with the memory modules we used. The Crucial DDR3-1066 does not have XMP profiles embedded and it only supports the standard JETEC timings. Therefore, the motherboard automatically selects the 1066Mhz (2:8 divider) and locks at this speed. Selecting other frequencies (for example 1333 or 1600) and upping up to CL8 simply doesn't work.
We changed the memory modules with the Patriot DDR3-1600Mhz XPM profile:

Patriot Memory DDR3-1600 Specifications
However, no matter if we chose XMP profiles or manually selected the 1600MHz with CL9 memory and 1.65V, the motherboard did not boot up and a loud beep sound was indicating that it wasn't working at all.
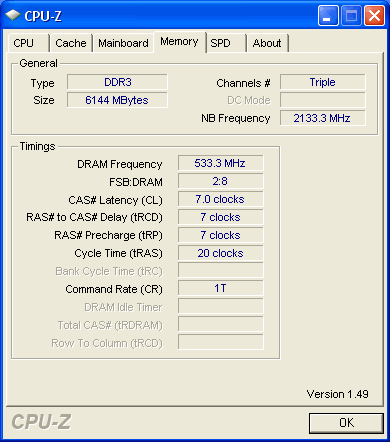
The Patriot Memory DDR3-1600MHz Auto Mode Selects the 533MHz at CL7
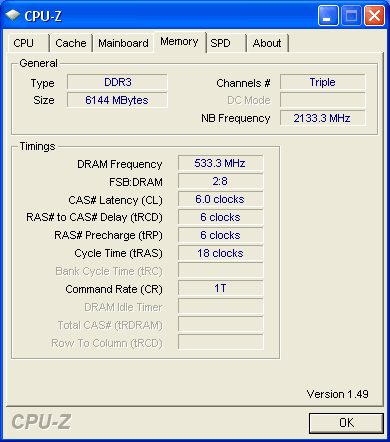
The Patriot Memory DDR3-1600MHz XMP Mode Lowers the CL to 6 instead of selecting 800MHz with CL9
Foxconn is also providing the the Fox One Windows software for overclocking. Although it may be useful, its overall layout was not so attractive and user friendly.
The first screen provides information about the various Voltage values and temperatures:

The software can run several tests and decide which overclocking scenario is the best for your system:

In our case and after some minutes of testing, the software suggested that CLK should be 158MHz:

This setting means that our CPU would by clocked just 0.64GHz higher than its default clock value.

Which however wasn't stable at all...

In addition, the Fox One allows you to manually overclock the DRAM, an option not available under the mainboard's BIOS:

You can manually adjust the CPU/DRAM/NB voltages:

Concluding our overclock experience with the Foxconn Renaissance, we are satisfied that the motherboard is able to overclock the Core i7-920 up to 3.60GHz very easily and without extra efforts. After that point, things become rather difficult. We couldn't stabilize the system even after rising up voltages. What we didn't like is the fact that the memory dividers did not seem to work at all, at least with the two different triple DDR3 memory modules we tried, not to mention that the Turbo function won't work under the overclock mode.
Lastly, Foxconn could make the motherboard display the real cpu frequency at the post screen. This way user would avoid guessing whether the overclock attempt was successful or not after every reboot.
Review Pages
2. Asus P6T Deluxe/OC Palm Edition - Opening the box
3. Asus P6T Deluxe/OC Palm Edition - BIOS
4. Foxconn Renaissance - Specifications
5. Foxconn Renaissance - Opening the box
6. Foxconn Renaissance - BIOS
7. Testbed
8. Benchmarks - Everest Ultimate Edition, SiSoftware Sandra
9. Benchmarks - PCMark Vantage, BAPCo's SYSmark 2007 Preview
10. Benchmarks - MAXON CINEBENCH, x264 HD Benchmark, TMPGEnc 4 Xpress
11. Benchmarks - SuperPI, wPrime
12. Benchmarks - 3DMark 06, Crysis v1.2
13. Overclocking tests - Asus P6T Deluxe
14. Overclocking tests - Foxconn Renaissance
15. Conclusion


