Media Quality Tests
8. An example of submitting a test
Review Pages
2. View Page Description
3. Submission of Tests
4. Submit Tests detailled description
5. List of Tests conducted by a particular reader
6. Empty
7. An example of viewing a test
8. An example of submitting a test
9. Security constraints
10. Csv file format
11. Some suggestions for the proper submission
12. Measuring the quality of recorded media
13. Frequently Asked Questions
14. Glossary of Terms
15. Programming decisions
16. APPENDIX 1. UmDoctor Pro II
17. APPENDIX 2. KProbe
18. APPENDIX 3. CdSpeed
19. APPENDIX 4. PlexTools Professional
An example of submitting a test
We assume you have read the previous section on how to become a Member and Tester of our community and on how to view a particular test.
In this section we will show you how to actually submit a test. We suggest you also read all other sections of our review in order to grasp all aspects of the required procedures and have all your questions been answered.
Once you have logged on to the CdrInfo.com Member home-page, one of the available options you have is to submit Media Quality Tests.
To do this choose the tester role from the MediaTests menu

When the new page loads you will have been direct to the MediaTests page. By using the navigation menu on the left, you are able to view the submitted tests, post new tests and edit previously posted tests .

To submit a new test just press the Submit Test button and you will be directed to the submit test page

For this test I am going to submit the test results of a Taiyo Yuden (TY) CD-R, written with a Plextor PX-W1610A. The Program used for the quality test is the UMDoctor Pro II and the reader is the Optorite DD0401 drive. The test type is C1/C2.
In order to proceed to the submit test page i have already saved the required .dat files from UmDoctor as shown here
On the top left of the submit area, there is the media type selection area. I choose CD-R for media type because I want to test a CD-R

Below this area, the test type listbox is populated by options accordingly. I choose C1/C2 as the test type

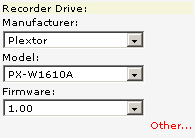
On the next column to the right, the Recorder Drive column I will select the specifications of my writer. As soon as I choose Plextor for manufacturer, the next selection loads and I choose the Model and finally the Firmware of my Recorder, as seen below.
Next to the Recorder Drive column, there is the Disc Column. Here I will select the specifications of the written disc.

I select Taiyo Yuden as Manufacturer, CD-R Unbranded silver for Model because there is no brand on the surface of my disc and finally the ID of my disc .To find out the ID of my disc I have already used the DVDinfo software available here.
Please notice that on the right corner of both the Recorder Drive and Disc column there is an Other button, marked on the above photo, that will direct you to the Data Inclusion Request page. You can use this button to request the inclusion of a new drive or a new disc. The fields that must be filled are shown below. Take a notice that is separated in two categories. The drive request and the disc request.


In the following step I will choose the program that I used to test (scan) the recorded CD-R. UmDoctor Pro II is the program used for this demo.
![]() According
to my previous choice, I can only choose an Optorite drive from the listbox
shown here.
According
to my previous choice, I can only choose an Optorite drive from the listbox
shown here.

This is the final step on the selection of the parameters for submitting a test result. On this menu I have choose the speed that the disc was recorded(16x) and the speed that the cd was tested.(24x)
The next step is very important. By pressing the ![]() button
I will check if the parameters that i have entered up to this time
are correct and if the this particular test has already been submitted
by me or not.
button
I will check if the parameters that i have entered up to this time
are correct and if the this particular test has already been submitted
by me or not.

The test availability window pops-up and informs me that I have made a Complete parameter selection and additionally this test has Not been submitted by me.
If the pop-up window looks like this

you will have to check for missing parameters, or you will have to change at least one of them in order to define a non-already posted by you test. (There is a requirement for only 1 test per parameter selection and per user.)
Up to this point I have chosen the settings of my test, and I checked my settings for a test availability. The next thing to do is to locate the .dat file on my pc. I click on the browse button to load the .dat file from my pc.
![]()
This contains the results of the test whose parameters I have defined above. Then I press the "Load Original Csv File" button.When the page loads you will see the following picture.

On the next step there is a "Shrink Csv File" button that will make my file shrinked to about 1KB in size. I press the "Shrink Csv File" button and the .dat file loads on a new panel to the right. Notice that the new file is now Comma Delimited.
![]()
Just like in the previous step there is a ![]() button
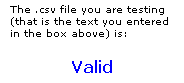
to test if the loaded file is valid to submit or not. I press the Check .csv
Validity
button and a new window pop-up to inform me if my .Csv file is Valid
or Invalid.
button
to test if the loaded file is valid to submit or not. I press the Check .csv
Validity
button and a new window pop-up to inform me if my .Csv file is Valid
or Invalid.
The following picture shows that I have made an invalid submission and informs me to correct the submission

On the following photo we can see the window that pop-up in case the submissions is valid
The final step in order to submit the test is to press the submit button.
![]()
Review Pages
2. View Page Description
3. Submission of Tests
4. Submit Tests detailled description
5. List of Tests conducted by a particular reader
6. Empty
7. An example of viewing a test
8. An example of submitting a test
9. Security constraints
10. Csv file format
11. Some suggestions for the proper submission
12. Measuring the quality of recorded media
13. Frequently Asked Questions
14. Glossary of Terms
15. Programming decisions
16. APPENDIX 1. UmDoctor Pro II
17. APPENDIX 2. KProbe
18. APPENDIX 3. CdSpeed
19. APPENDIX 4. PlexTools Professional