Terramaster TD2 Thunderbolt 3
3. Installation
The device is compatible with major operating systems, like 64-bit Windows 8/10 OS, MAC OSX 10.12.6 and Terra-Master suggests at least an Intel i5 quad-core, 4GB Memory and of course Thunderbolt 3 interface for connectivity.
In order to install HDDs, you need to unlock the slots, open and hold the hard drive tray’s handle, and pull the tray out from the device. Note that this device does not support hot swap. Therefore, before you replace a hard drive, please safely eject the device from your computer every time. You have to use the supplied screws to mount the HDD to the HDD slot and as a final step to insert the tray back into the device. Connect the power jack to the wall power socket and use the supplied Thunderbolt 3 cable with a compatible device (either PC or Thunderbolt 3 devices). Users should us the Thunderbolt 3 interface 1 Interface for computer (compatible with USB) /charging use and the Thunderbolt 3 interface 2 only for a daisy chain connection!
You could also connect your device to a single 8K monitor or dual 4K monitor using DisplayPort 1.4 or Thunderbolt 3 interfaces. Before final use, you should check if your computer has the latest Thunderbolt 3 interface driver installed.
We also removed the back fan easily and got the internals of the device.
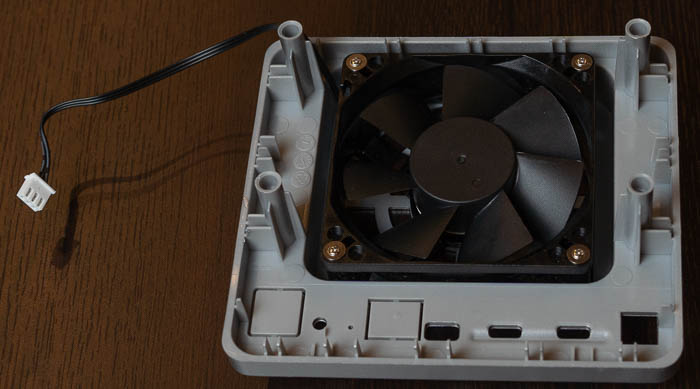
We found upon the main PCB various chipsets like:
- Realtek RTS 5420 USB 3.1 Hub controller
- Asmedia asm1352r

- Powering up
The device after connected to a PC system will immediately appear in the Device Manager as "TerraMaster".
Use A Hard Drive with Data
The default factory mode for your device is SINGLE mode. In SINGLE mode, every hard drive displays a different drive and works independently. If you are installing a new hard drive, you need to initialize your drive. If you install a hard drive with data and want to use SINGLE mode, you can simply start using your device without changing any settings
RAID Mode
Creating or changing your RAID mode may lead to hard drive formatting. Consequently, all hard drive data will be deleted. Therefore, please take caution and back up your data in advance. The device supports the following RAID modes: RAID 0, RAID 1, JBOD, and SINGLE. The device uses a rotary switch to select the RAID mode. You’ll find this switch at the back of your device.
When creating a RAID, use a screwdriver to rotate the switch pointer to your desired RAID mode. Use a pin to press and hold the reset button for about 5 seconds (until the HDD indicators turn to red from green). After about 3 seconds, the HDD indicators will turn to green from red (indicating that the newly-set RAID has taken effect). Before you can use a newly-created RAID, you’ll need to initialize it. Because the initialization process is different on each operating system, Terramaster has an online guide for you convenient, either for Windows or MAC users.
Several important notes to consider for its operation
- When you press and hold the reset button for 5 seconds, the data on your hard drives will be deleted. Therefore, please proceed with caution;
- Do not remove your hard drive while it is being accessed;
- Does not support connecting two computers simultaneously;
- Before you turn off your device or disconnect it from your computer, be sure to remove it and eject it safely. Otherwise, there is a risk of data loss;
- When you turn off your computer, hibernate your computer, eject the USB device, or remove the USB connection, the device will automatically enter hibernation;
- When you access the hard disk or connect the USB device again, the device will cancel hibernation.
- The network interface provides a network only for your computer. It cannot convert your hard drive into a network drive.
- Thunderbolt port 2 cannot be connected to a computer to transfer data.
My computer won’t recognize the hard drive, and no drive letter appears?
- If the hard disk indicator is green, go to Windows Disk Management to initialize the hard drives, or use the MAC disk utility to erase the external device;
- If the hard drive indicator is off, please confirm whether the hard drive is installed properly. Remove and insert the hard disk to try again.
Not working on a computer with a Thunderbolt 2 interface?
- Only use the Thunderbolt 3 to Thunderbolt 2 adapter provided by Apple. Any other adapters will not work;
- The cable connecting the computer to this device must be a certified Thunderbolt 2 cable.
Failed to create a RAID?
After the RAID is created, if the hard drives cannot be initialized in Windows Disk Management, or the external device cannot be erased in Mac Disk Utility, the RAID has not been created successfully. The following steps should thus be taken:
- Rotate the switch’s pointer to SINGLE mode;
- Press and hold the reset button for about 5 seconds (until the HDD indicators turn to red from green);
- After about 3 seconds, the HDD indicators will turn to green from red. At this point, rotate the switch’s pointer to your desired RAID mode;
- Press and hold the reset button for about 5 seconds (until the HDD indicators turn to red from green);
- After about 3 seconds, the HDD indicators will turn to green from red. This indicates that RAID creation is complete.
Note: According to user’s reports, you cannot run a HDMI monitor in to the DisplayPort on the enclosure. HDMI to DisplayPort is not supported. Neither is DVI to DisplayPort. Your spare monitor must have a dedicated DisplayPort input in order for this to work with the DisplayPort output on the enclosure. DVI to DisplayPort and a HDMI to DisplayPort cable will not work!