Toshiba FlashAir III 32GB SDHC review
2. Software
Review Pages
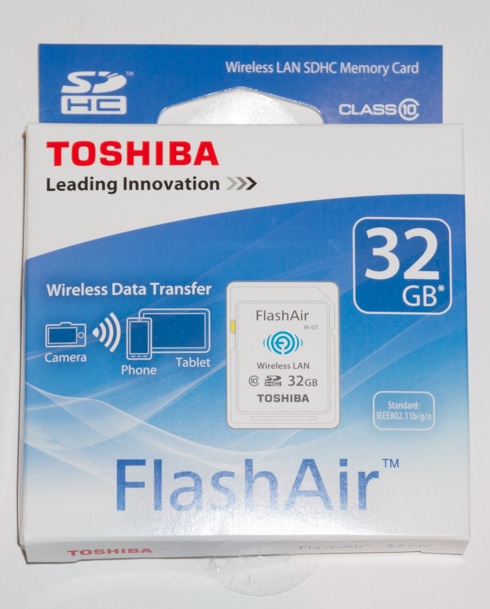
The package includes:
- Toshiba FlashAir III Wireless SD Memory Card
- Jewel Case
- Information sheet
- 5-Year Standard Limited Warranty

As far as SD cards go, the Toshiba FlashAir III has the same has a sleek looking off-white enclosure and black inscription. It is of standard size and weight and can fit into any SD slot on a camera or PC.
On the front-side, it has all relevant information including the FlashAir III name (W-03) wireless logo, capacity, and the Toshiba branding. Also shown on the front of the SD card is the Class 10 speed designation.
There is a also small slide-locking mechanism. When locked, all images that are taken are protected.

The reverse side of the card features 9 gold connector pins.

- Setup
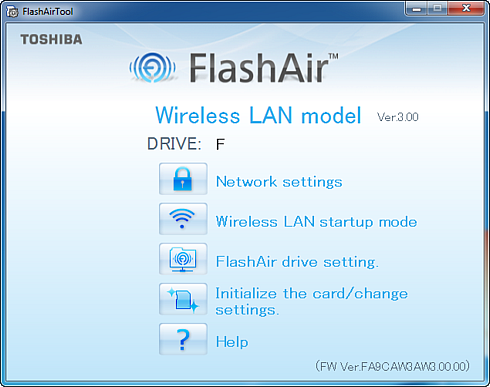
First you should download the latest FlashAir configuration software and installed it to a PC. Insert the FlashAir III card into the computer's SD card slot and start the "FlashAirTool" software. The window below will open and will soon detect the FlashAir III card. make sure that the write protect tab on the card is set to LOCK.

Once the card is recognized, the following main window will show up. Fro there you can set the network settings, the wireless LAN startup modes ( Automatic startup and manual startup) and also initialize the card.
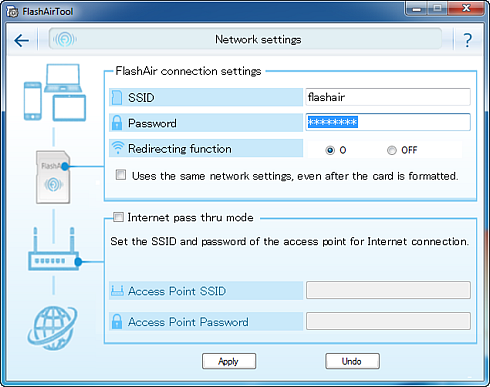
In the network settings window, the following settings can be configured:.
・The FlashAir SSID
・The FlashAir password
・Redirecting function settings
・Internet pass thru mode settings
・The SSID of the access point used for internet pass thru mode
・The password of the access point used for internet pass thru mode
The redirecting function automatically redirects the browser to "http://flashair" when accessing the FlashAir card with the browser on your smartphone or similar.
This function is available for FlashAir W-02 and FlashAir W-03 cards.
The Internet pass thru mode
allows a connection to another access point to be made via the FlashAir card. When an internet access point is connected to, images stored on the FlashAir card can be viewed, and the internet can also be accessed.
When Wireless LAN Startup mode is selected, the following window appears.
There are two startup modes, Automatic startup mode and Manual
startup mode.
When the Automatic startup mode mode is used, wireless LAN functionality will start up automatically when the device (e.g. digital camera) that the FlashAir card is inserted into is turned on.
If there is no attempt to connect to the FlashAir card from a device (e.g. smartphone) within the time set in the timeout setting, the wireless LAN functionality automatically turns off.
When the Manual startup mode is used, wireless LAN functionality stops and starts when image protection is turned on and off on the digital camera. This can prolong battery life as wireless LAN functionality only turns on when necessary.

FlashAir III drive makes it possible to copy FlashAir files to a computer via wireless LAN using file management software (e.g. Windows Explorer, Finder on Mac computers).
In other words, just like a network drive, you can see files on the FlashAir card on your computer when the FlashAir card is still inserted into the digital camera or other device that it is normally used in. You can then copy these files from the FlashAir card just as you would copy files on your computer.
Of course, the "FlashAir drive setting" can only be used on computers equipped with wireless LAN.
To use this function, set the "Wireless LAN Startup Mode" to "Automatic startup mode".
This function is only available for FlashAir III W-03 cards.
As a note, the FlashAir drive setting can only be used to copy files on the FlashAir III card to a computer. It cannot be used to copy files from a computer to a card.
If you attempt to copy files from a computer to a FlashAir III card, it will appear as if the files have been copied in Explorer (Finder), but the files will not actually have been copied to the FlashAir card.
If you select "FlashAir drive setting", the following screen will be displayed:

If you select "ON" and click the "Apply" button, a window guiding you through the FlashAir drive setting procedure appears . Follow the instructions to configure the FlashAir III drive, if it has not already been configured.

If the network settings were configured using a smartphone or similar and not this software, the SSID and password confirmation screen shown below will appear. Enter the password and click "Next".

If the network settings were configured using a smartphone or similar and not this software, the SSID and password confirmation screen shown below will appear. Enter the password and click "Next".
The next step is to remove the FlashAir III card from the card reader/writer or SD card slot, then insert it into the device with which you will normally use the card (digital camera e.t.c). Turn the device on, and click "Next".

The FlashAir drive III will be configured. It may take several minutes to configure the FlashAir drive. If the digital camera etc. is set to turn off automatically, change the setting so that it will not turn off during this step.
Using the FlashAir drive with Windows
A background application will start up when the FlashAir drive has been configured. You can Right click in the system tray to display a menu with the following options: "Connect to FlashAir", "Disconnect FlashAir" and "Exit". Click "Connect to FlashAir" to connect to the FlashAir card via wireless LAN and open Explorer.


The "Initialize the card" function restores the card settings to the default settings. If "Initialize the card" is performed, all data recorded on the card will be deleted. Be sure to back up the data on the card using a PC or other SDHC compatible device before initializing the card.
When "Initialize the card/change settings" is selected, the screen below will be displayed. If the card is initialized, the initial FlashAir settings (Network settings, Wireless LAN startup mode and FlashAir drive setting) must be reconfigured. When the card is initialized, this software will recognize the card as a new card and a message saying "An unconfigured FlashAir card has been found" will be displayed. Then, a window guiding you through the initial setting procedure will appear. Follow the instructions in the window to configure the card.

The MASTERCODE allows network settings such as the FlashAir SSID and password to be changed using the smartphone app. To set a MASTERCODE, enter the code you want to set and click the "Apply" button. The MASTERCODE must be 12 alphanumeric characters.
Set a MASTERCODE if you wish to be able to change network settings on your smartphone.
If a MASTERCODE is not set, the network settings can only be changed on the device (computer, smartphone etc.) on which the initial FlashAir settings were configured.
Review Pages


